Homelab Chronicles 15: Three VLANs to Rule Them All

I finally split out my IoT devices onto their own VLAN. That’s it that’s the post. See you all next time!

No, of course I gotta say more. I’m a wordy MFer, after all! But yes, I finally put the IoT stuff on its own network. I should’ve done it a long time ago. It’s been on my list of Homelab to-do’s for like 4-5yrs. A good chunk of not doing it was because I wasn’t sure how to implement it.

I had experimented with VLANs a couple years ago, then doing some basic firewalling to make sure the VLANs and the devices on them couldn’t communicate. I set up a couple VLANs and then created an “RFC 1918” firewall rule to disallow communications between VLANs and their associated subnets. I even have a couple ports tagged on my switches for network isolation purposes.

Lately at work, however, I’ve had some opportunities to play around with and troubleshoot some of the network and firewall issues. So with that better understanding of the Unifi Zone Firewall Policies, I finally pulled the trigger.

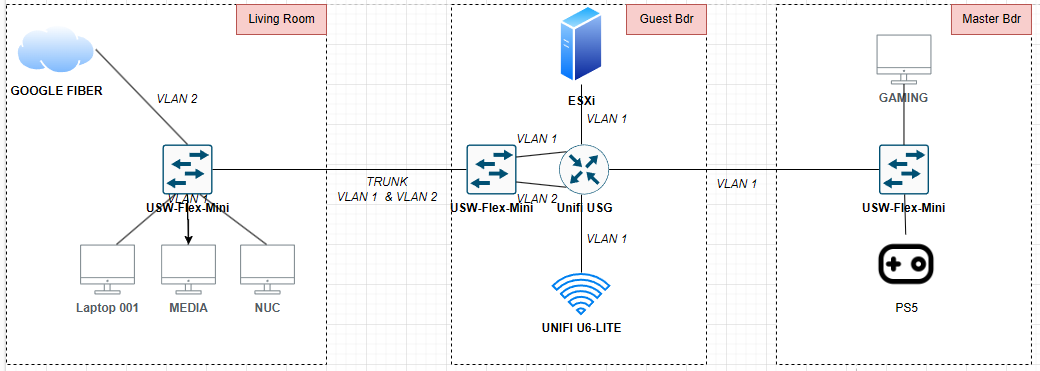
I guess I’ll start from the beginning, explaining the three main VLANs I have:

  1. The Default/Main VLAN. This has my computers, consoles, phones, etc.
  2. The Guest VLAN. This one is attached to my guest WiFi, naturally. Device isolation is enabled here.
  3. The IoT VLAN. This is my smart plugs, WiFi bulbs, Google Nest devices, TVs, etc.

The reason for separating the IoT devices from everything else has to do with security. Some of these devices are cheap smart plugs and even smart bulbs. Some of these are from overseas companies I’ve never even heard of before. That’s on me for using these instead of stuff from a more reputable brand, but still. Who knows what any of these devices are doing or watching on the network. I’ve mentioned before I have some Google Nest devices. Are these snooping on my network, sending network usage patterns back to Google? Who knows.

Anyway, most of these IoT devices require WiFi. So I created a new WiFi SSID and attached the IoT VLAN to it. I don’t necessarily know if it increases security, but I also set it as a hidden network. At the very least, since I live in a sizable apartment complex, I didn’t want to further clutter up an already cluttered SSID list. That said, there are one or two devices that are wired, such as TVs. For those, I had to tag ports on the appropriate switches. That’s one area I would like to play with more: port tagging. However, since I’m using some of the more basic Unifi gear, there are some limitations.

Fom there, I merely had to place the networks in the correct zones. I created a new IoT zone and then moved the IoT VLAN into it. My Main network is in the out-of-the-box Internal zone. And when I created a Guest WiFi network, Unifi automatically placed it in the Hotspot zone, with the proper firewall rules to isolate the network (devices on the Guest network are also isolated from each other).

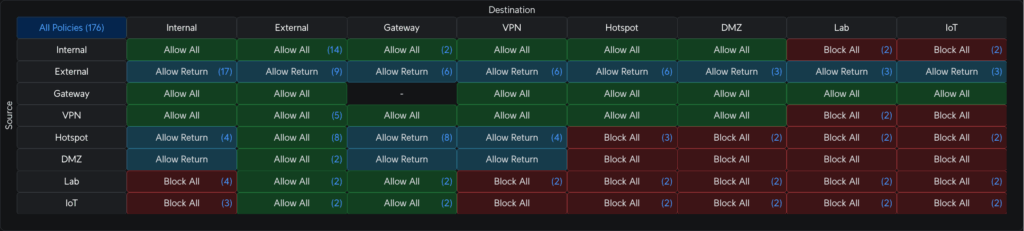
By default, user-created zones in Unifi are automatically isolated from other networks (though they’ll always at least have Internet access, which is in the External zone). So creating the IoT zone did most of the work for me. I didn’t have to create all these rules to isolate it from other zones. However, I wanted devices in the Internal zone to be able to communicate to devices in the IoT zone. Two reasons for this:

  1. If I lose Internet access, I want some limited control over IoT devices. I don’t want to have to press the power button on my smart switches if I want to turn them on/off; I want to be able to use my phones and apps.
  2. I have a Chromecast and a few other devices that I can cast media to. I moved those devices to the IoT VLAN, but of course my computers and phones will remain on the Main VLAN.

However, if a device is communicating “down” to devices in the the isolated IoT VLAN, there needs to be some ability to communicate “up” as well. If I ping from Main to IoT, that only works if IoT can respond back. But I don’t want to devices from IoT able to initiate and maintain connections to Main.

Luckily, Unifi makes this easy—though I had to ask around and play around a lot to figure this out.

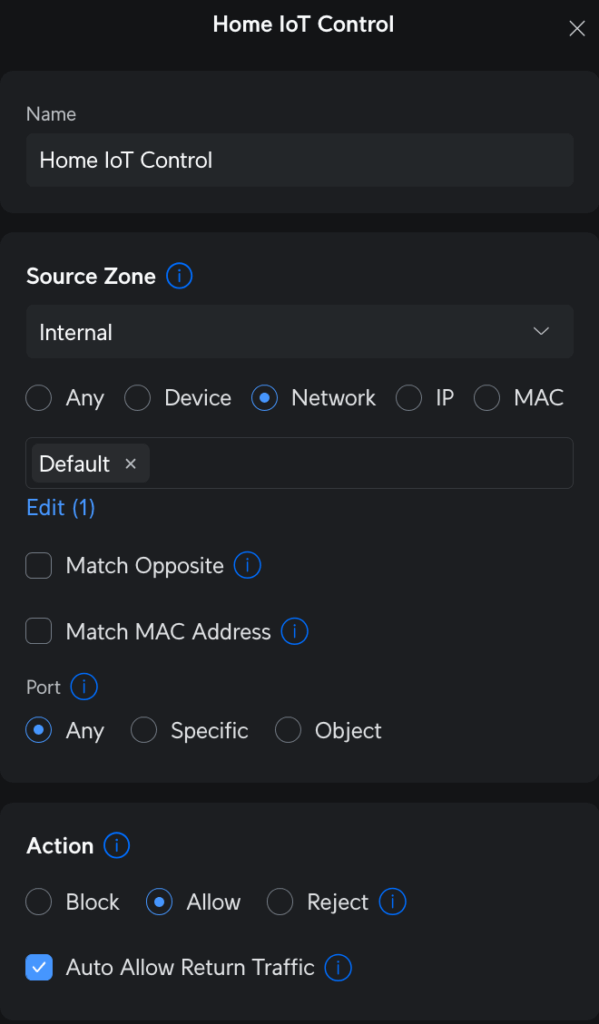
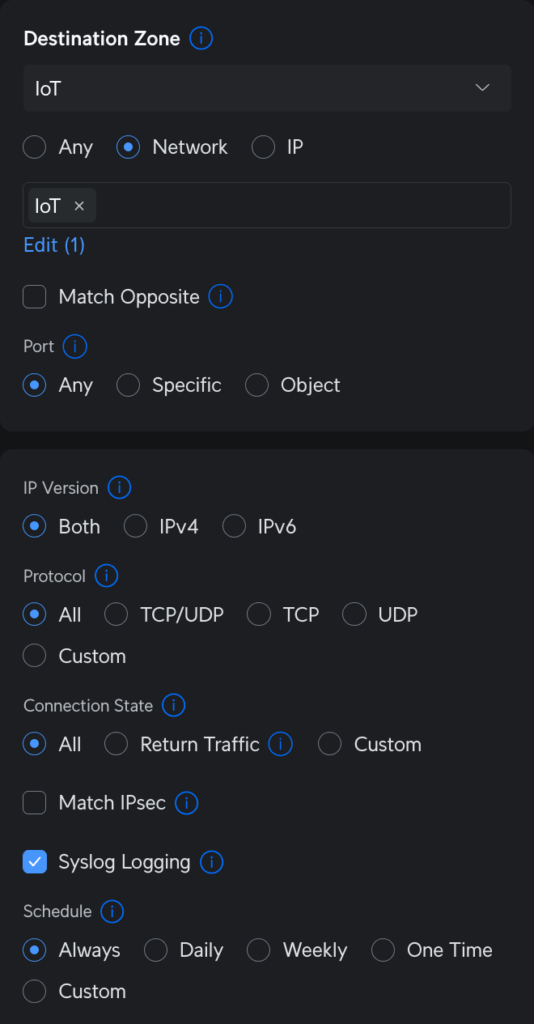
One single rule in the “source Internal, destination IoT” part of the zone matrix can be made to allow this behavior. On the source side, I selected the Main (Default) network in the Internal zone to allow connections on any port. On the destination side, I have the IoT network in the IoT zone. The most important thing here is, on the source parameters, that checkbox to “Auto Allow Return Traffic.” When the rule is saved, that checkbox creates a corresponding partner rule in the “source IoT, destination Internal” part of the matrix to allow only traffic from IoT only if Internal initiated first.

Essentially, I can ping from Main to IoT, but I can’t ping from IoT to Main. This works because the “bottom” rule, or broadest firewall rule, in the IoT zone, disallows traffic to/from any other zones. Like I said before, that’s Unifi’s default behavior for new zones. My rule creates an exception to the policy.

I tested everything out afterwards, and the results were mixed. I disconnected my network from the Internet to see how different applications would react. From my cell phone (also only on WiFi), I could easily still control the smart plugs, which is exactly what I wanted.

But the media casting wasn’t as successful. The Chromecast seemed to accept casting from a computer via direct network connection, but Spotify on my phone didn’t quite work with my Google Nest speakers without Internet. Not ideal, but I don’t cast that much anyway. The main thing is controlling my lighting.

With this finally done, I feel like my basic network setup is essentially complete. There’s always more that I could tweak. For example, I have a printer. Maybe I put the printer on its own VLAN and allow any device in any network the ability to print to it. Right now, it sits in the Main VLAN with my computers. I don’t have that many guests, so it’s really NBD.

But for now, this is good. Time to move onto something else.

Homelab Chronicles 13: A Year in Review

As I said in my last post, I recently moved. Which mean that all the work I did in my last apartment is gone. That was mostly physical infrastructure work, particularly the cabling. So now I get to do it again; joy!

But before I get into the new place, I should visit some topics from the past. An update of sorts. Just because I haven’t posted in a year doesn’t mean the homelab has sat untouched for a year.

UPS Delivered!

Back in April, I finally bit the bullet. I bought a “CyberPower PFC Sinewave Series CP1000PFCLCD – UPS – 600-watt – 1000 VA.” I wanted something that would communicate with ESXi to initiate a “semi-graceful” auto-shutdown if wall power was lost.

PowerPanel dashboard, showing the UPS status as normal and full charged.

I say “semi-graceful” since with my setup, I only have ~17min of battery life. That covers three devices: my server, my Unifi Secure Gateway (USG), and a 5-port Unifi Flex-mini Switch.

Via the accompanying PowerPanel software, I can monitor battery status, while also configuring the shutdown behavior in for ESXi. I actually have PowerPanel installed as a separate VM in ESXi. Probably not the best idea, but it works.

Back to the semi-graceful shutdown, VMs sometimes take time to properly shutdown, especially Windows Server. So between ESXi and PowerPanel, I give some time for the VMs to gracefully shutdown. But if they don’t shutdown in time, then ungraceful shutdown of VMs occur, before ESXi gracefully powers down.

Took a bit of testing to get it all figured out, but it does work. At my last apartment, there were a couple of brief blackouts or brownouts. The UPS did exactly what it needed to do.

My (Home) Assistant Quit on Me

The very last post of 2023 was me futzing around with Home Assistant. I had a “concept of a plan” to automate some of my smart home devices.

After getting it installed, though, I didn’t really do much more with it. Stupid, I know.

Unfortunately, at some point towards the end of 2023 or beginning of 2024, the HAOS VM bit the dust.

“Failed to power on virtual machine…File system specific implementation of LookupAndOpen[file] failed.”

I don’t exactly know what happened, or when it happened. But I know there was a power outage one night. A storm, I think. Before I had my UPS…

I can’t say for certain the power outage was the reason. After all, it was at least a couple weeks later that I realized HAOS wasn’t turned on. When I tried turning it back on, I got that message, and have ever since.

I did look into this error message a little bit. But I think reinstalling HAOS is the better choice. Especially since I didn’t do any further setup anyway.

Glad I have the UPS now 🙂

Playing with Proxmox

Over the last year or two, the big news in the virtualization space is VMWare selling out to Broadcom. And Broadcom absolutely trying to squeeze out every last penny in licensing. Recently, AT&T disclosed that Broadcom was seeking a 1050% price increase on licensing.

I’m still using ESXi/vSphere 6.5 U3 on older than 10yrs old server. Which is fine, but at some point I’ll need to replace the hardware and software. Unfortunately, there are no more perpetual, free licenses for non-commercial purposes. I never even got a 7.0 license.

With that in mind, I thought it’d be interesting to play with Proxmox, which is a FOSS virtualization platform. As such, I installed it on another server I had lying around. Unlike ESXi, Proxmox is nowhere near as user friendly. And the documentation that’s available is pretty poor, in my opinion.

That’s one of the reasons FOSS sometimes annoys me: it’s often not very accessible to anyone who’s not already an expert. But that’s a topic for another post.

The first thing I wanted to do was connect my current NFS-based OS ISOs storage to Proxmox. This way, I wouldn’t have to use extra drive space on the new Proxmox server by copying over an ISO. If the data exists on the network, use it! This NFS share is hosted on my primary Windows Server VM.

I was able to point Proxmox to the NFS. However, Proxmox wanted to use its own directory structure within that NFS. I found that rather annoying. This wouldn’t be where the Proxmox VMs live, after all. It’s simply where the ISOs are. Why should I have to rearrange the directory structure and files just for Proxmox?

I honestly don’t remember if I created a VM after all that. I don’t remember if it worked or not. But given the situation with VMWare, that won’t be the last time I play with Proxmox.

Let’s Get Physical, Physical (Again)

The last thing to report is minor, but worth mentioning. I ended up adding two more Ethernet runs. The important one being from one room to another, underneath the carpet and along the baseboards. Ah, the joys of apartment living.

Anyway, that’s not that big of a deal. I had already done it once, after all.

Rather, it was the idea that led to this. In my old apartment, the Google Fiber jack (ONT) was in the living room. The guest room down the hall served as the “server closet.” The server, Unifi AP, main switch, UPS, and other devices were in the guest room. But the Unifi Secure Gateway (USG) was in the living room, since the Internet point of entry was there. Which seemed strange to me. I wanted all the main gear in the guest room.

It’s hard to explain without a map or diagram, so I’ll use some. This is the diagram of my original layout:

My original setup at my last apartment. Simple, if not a bit overkill.

To move the USG to the guest bedroom, there were two ways to achieve this. One was by adding a second run from the living room to the guest bedroom. One run would connect the fiber jack to the WAN side of the USG. The other run would connect from the LAN side of the USG back to the switch in the living room.

But I wondered if it was possible to do this:

Note that the USG doesn’t have that many ports; I forgot to add a second switch in that room, but the idea still stands.

Essentially, could a WAN connection go through a VLAN? Because if it could, I wouldn’t have to run another cable. I looked it up and even asked on reddit. And the answer was yes, this is entirely possible and not that unusual!

Unfortunately, when I tried to do this, it didn’t work. It even caused me some more issues with the Unifi controller being inaccessible while it wasn’t working.

In the end, I just laid a second down a second Ethernet run. Maybe I gave up too quickly, but sometimes the easiest solution…is simply the easiest solution 🤷‍♂️


So that was last year in the life of the homelab. Not as much as I wanted to do, but it was at least something. And that’s the point, right? To at least play around with it and learn something.