I’m lazy. To the point where I don’t even want to get up to turn off the lights. Thank god for Internet-enabled home automation.
I started with smart plugs — which I’ve had for several years now — then expanded to Google Nest devices (“Hey Google, turn off my lights!”), smart bulbs, and an Ecobee thermostat. I even have an indoor security camera, but that’s not really a part of my automation. Still an IoT device though. Anyway, these are all different brands: Google, TP-Link Kasa, Ecobee, Tuya, etc. Luckily, home automation has evolved to be pretty open. As in, I can control everything from Google Home on my phone. I have the separate apps for each brand, but I do tend to mainly use Google Home. It works great; only the security camera still needs its native app for me to view the live feed or recordings.
Though with the continuing and increasing rate of “enshittification of the Internet,” I thought it might be a good idea to ensure that my home devices don’t have to rely on the “goodwill” of these companies and their clouds. Just because controlling my smart plugs from anywhere in the world is free today, doesn’t mean it can’t be a paid subscription tomorrow. Looking at you, BMW, and your heated seat subscription.

Enter Home Assistant. I’d been hearing about Home Assistant for some time now, on reddit, Lemmy, Tildes, etc. I also have a couple of friends who use it, too. So I thought I’d finally give it a try.
I’ll probably break this up into a few parts, since this will be an on-going project to get everything working properly and the way I want. Home Assistant can be a very powerful automation hub, but it’ll likely require a lot of configuration and tinkering. I need a plan.
The Plan
- Install Home Assistant. Find out what the hardware requirements are and what I can run it on. I have a server (or three…though only one is ever running) plus many other spare or backup computers lying around. So I have options.
- Add all or as many of my IoT devices that I can. Some basic research shows that all the brands I use have integrations with Home Assistant.
- See what can be controlled locally. Hopefully everything! If I lose my Internet connection or the cloud is no longer free, will I still be able to control my devices? Right now, that’s not the case with all my devices. That’s the main reason I want Home Assistant: local control.
- Create the automations. My automations are simple: lights, via the smart plugs, turn on and off at certain times. My Ecobee thermostat has standard programming options of if temperature hits X, then do Y. But maybe there are more advanced things I want my devices to do. I’ll find out what’s possible.
- Remotely access and control Home Assistant from wherever I am, so long as I have Internet access. I can do that now via Google Home and the various native apps. Can I do this with Home Assistant, given that it’s installed locally? How can I do this securely? While my thermostat and camera are what I mess with the most when I’m out and about, I do sometimes turn lights on and off. This is especially true when I’m out of town.
The Installation
This did not go smoothly. Home Assistant — I’m going to use HA or HAOS from here on out — has many guides on installing the system, with several different routes one could take. Which is great, but I also feel like the guides aren’t as complete as they should be and are inconsistent.
I initially wanted to install HA on my Ubuntu Server VM. It’s getting a bit loaded up with stuff — the Unifi Controller, DDNS stuff, Docker, and Wireguard — but thought it’d be fine. However, I quickly realized that HA is mainly a standalone OS. There are other versions, but HAOS is the recommended one.
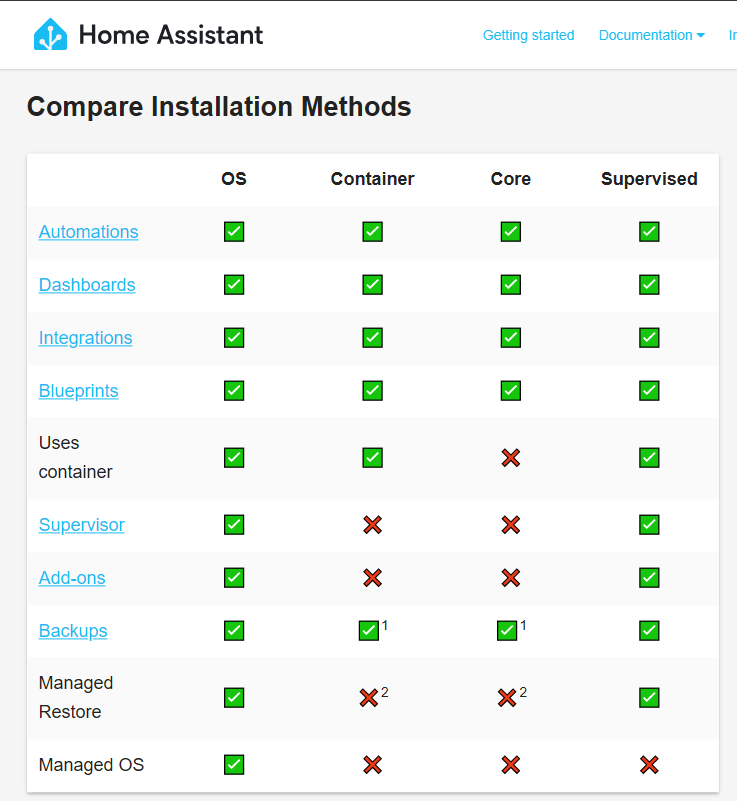
OK, no problem. I can install it on a NUC I have lying around. Or better yet, I have ESXi on my server; just a matter of creating a new VM. This is where it started getting confusing. Rather than just showing me an ISO, there was an option for installing on a Generic X86-64 bit machine. That’s what I wanted right? A VM is just that; just not physical.
Attempt 1: Generic X86-64
I downloaded the specified img.xz file, extracted the IMG file with 7-ZIP, uploaded it to my ISOs datastore in ESXi, and then created the VM. One important thing was to make sure the VM loads with EFI instead of BIOS. After setting it to EFI, I loaded the IMG in the virtual “CD Drive.” I’ve done this several times, to install Windows/Windows Server or Ubuntu as VMs.
Except that didn’t work. It was like booting without boot media. Nothing happened. The instructions were for a bare metal installation, burning the IMG on to a USB stick using something like Balena Etcher. Since this was a VM, I skipped all that. There’s no “virtual USB stick” needed here; that’s what the IMG file is. I tried a couple more times from scratch, deleting the VM and then recreating it, and it still didn’t work. I even tried mounting the IMG on my local machine; wouldn’t mount. I wasn’t sure what was going on there.
Attempt 2: Using an OVA/OVF in ESXi
Undaunted, I tried a different method. One of alternative methods. Hey, it even mentions ESXi here! Wish I’d seen that beforehand. I downloaded the OVA file (never used one of these) and then used the option in ESXi to “Deploy a virtual machine from an OVF or OVA file.” I selected the OVA file I downloaded and it was uploaded to ESXi. It was successfully created and I started the new VM.
It booted properly and began loading up. All was looking good, until I started seeing some warnings and errors. They were similar to this. And it just kept looping. I tried rebooting the VM a few times, but it kept giving the same error. It never got to completion.
After deleting the VM, trying again with the OVA file a few times, but getting the same error, I was getting very frustrated. This was still only the installation!
Attempt 3: Using a VMDK in ESXi
Finally, I found a guide on the HA forums on how to install HAOS on ESXI 6.7 (I have 6.5, but the versions are basically the same). This one references a VMDK file! I’m more familiar with those. I did eventually find where to get a VMDK under the Windows or Linux install instructions. I guess for those two platforms, the idea is to be running HAOS in VMware Workstation. Why a VMDK isn’t also linked in the alternative methods guide, I don’t know. Or more importantly, why isn’t this forum post part of the official methods?
Either way, it finally booted to completion, and the lovely HAOS “banner” showed in the VM’s virtual console.
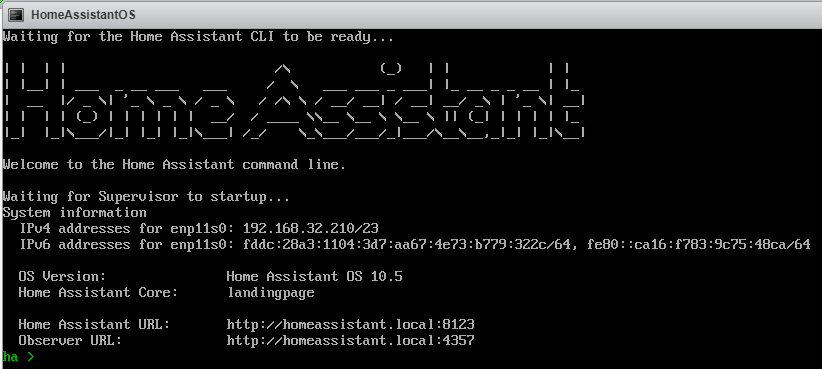
It took me 2 hours to successfully install and boot the OS. But now that part was done! Now I could start Onboarding with HAOS.
Delayed (On)boarding
I quickly typed in the the .local address into my browser, to get to the Web UI. After fiddling with some browser settings (I had a browser-based VPN option enabled for “securing” non-HTTP sites, which I had to turn off), the page loaded!
Except the system was still “preparing” and could “take up to 20 minutes.”
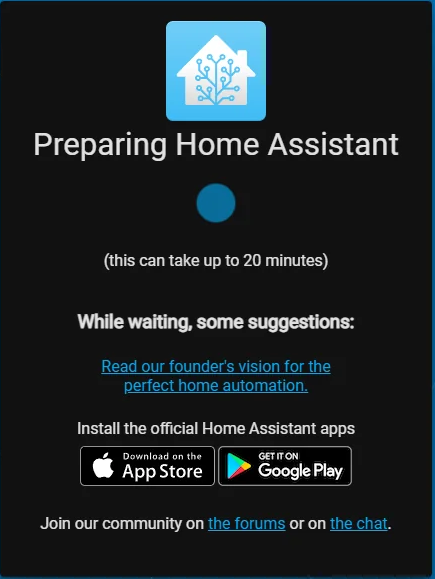
What? What kind of preparation takes 20 minutes? OK, whatever. I left it up on another screen while I went back to whatever else I was doing. After at least 20 minutes of still seeing this screen, I was getting worried again. Luckily, clicking that blue dot showed a log.
This is what I found, repeated over and over:
23-09-30 02:49:30 ERROR (MainThread) [supervisor.misc.tasks] Home Assistant watchdog reanimation failed!
23-09-30 02:51:30 WARNING (MainThread) [supervisor.misc.tasks] Watchdog miss API response from Home Assistant
A quick Google Search led me to a GitHub issue where others had been reporting a similar problem. Luckily, it was a fairly recent post; the initial issue was reported only 3 weeks ago (at the time of this writing).
There were a couple potential solutions there, including trying to install HAOS 10.4 — I was using 10.5 — and then updating. But one that seemed to take the least effort was to simply…wait it out. A few people mentioned that after waiting a bit, the system eventually did what it needed to do and would be ready for input. For some, it took 15 minutes, while others waited hours.
One project contributor even mentioned what was going on:
tl;dr: The errors are a bug in Supervisor, but download should continue despite the errors. Usually you just have to be patient while Home Assistant OS downloads the latest version of Home Assistant Core (which is around 1.8GB at the time of writing).
The details:
When first starting Home Assistant OS, the Supervisor downloads the latest version of Home Assistant Core. During that time, a small replacement for Core called landing page is running. It seems that the Supervisor does API checks for this small version of Core as well, leading to this messages:
23-09-26 10:33:48 WARNING (MainThread) [supervisor.misc.tasks] Watchdog miss API response from Home Assistant
23-09-26 10:35:48 ERROR (MainThread) [supervisor.misc.tasks] Watchdog found a problem with Home Assistant API!
23-09-26 10:35:48 ERROR (MainThread) [supervisor.misc.tasks] Home Assistant watchdog reanimation failed!
At first, a warning appears, 2 minutes later the first error appears. Both messages should not appear while the landing page is running, this is a bug in Supervisor.
If the download completes within 2 minutes, then non of this errors are visible. So this requires a somewhat slower Internet connection to show up.
Source: Agners on GitHub
While I was doubtful that this was some slow download issue — I have a gigabit Internet connection — I was frustrated and tired. It was already nearly 3:00am, and I really didn’t want to have to throw out this installation and try again or try HAOS 10.4. So I waited.
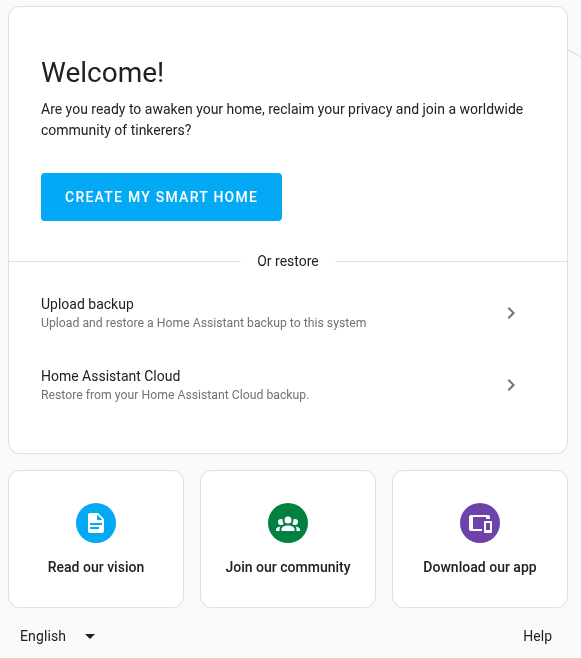
I didn’t go to bed; I was playing Final Fantasy XIV during all of this. But about 2 hours later, it finally did complete whatever it was doing, and I was prompted to create my smart home. I guess it was a slow download issue, probably on the other end.
Stage Completed
It was around 5:00am when I finally called it quits. I had been working on installing HAOS for at least 5 hours. Which I found to be a ridiculous amount of time and effort to do something that’s typically fast and simple. I have things to say about that, but that’ll be for another post, another day.
As I mentioned at the beginning, I felt like the official instructions were pretty mediocre. They weren’t necessarily wrong, but rather lacking in details and information. Because of that, it led me down erroneous pathways that were wastes of time. Thank goodness for other users.
If you encounter any issues, the official forums, GitHub, and the official Discord server are very informative and filled with helpful people. Past reddit posts also provided some decent help or at least pointers. So far, I’ve been able to find the help that I needed. Not all projects or systems can say that, even with large userbases.
Anyway, Home Assistant OS is now installed, running, and waiting for me. The next step is to add all my devices, which will be in the next entry.