All I wanted to do was look into setting up VPN access on my Unifi USG. That’s actually pretty easy to do.
I set up a L2TP VPN in the Unifi Controller, no big deal. But then I remembered that I don’t have a static IP address at home. Like most households, I have a dynamic IP address. Of course, even dynamic IPs tend to be “sticky.” At my office about a year ago, I found out that our router was misconfigured and not using a static IP address like it was supposed to when VPN connections stopped working one day. But it had been like a year since it was initially (mis)configured! Sticky, indeed.
Same goes for residential; it’s not unusual for dynamic IPs addresses to last weeks or even months. However, I didn’t want to have to deal with my home VPN not working when I needed it due to “losing” my IP address.
Thank goodness for Dynamic DNS (DDNS). Fortunately, the Unifi Controller makes it easy to use DDNS services. Unfortunately, my host/registrar—Dreamhost, where this site is hosted—wasn’t included in the easy-to-set-up services list in the Controller. Typically for DDNS, if the router doesn’t have this function built-in, software can be downloaded that quietly runs in the background, periodically updating the DNS records with the current IP address. Dreamhost doesn’t have that though, because they don’t provide out-of-the-box DDNS service.
A quick Google search, however, revealed that some kind soul had created a bash script to run DDNS for Dreamhost. Which meant I’d have to host this on Linux. My Ubuntu VM that hosts the Unifi Controller seemed like a good place. No sense in spinning up another VM for something so lightweight.
This is where it snowballed. Mainly because I don’t have a whole lot of experience with Linux, especially in the command line.
Task 1 – Setting up XRDP
Whenever I need to go into that VM, I sign-in to ESXi and use the remote desktop in there. But it’s limited in resolution and sometimes ESXi signs me out. I needed a proper remote desktop program and have for awhile.
I use a proprietary RDP program for my Windows and Mac machines. But it no longer support Linux. Bummer. But Google tells me that setting up an RDP server for Ubuntu is pretty simple. By using XRDP.
The main change I did here was to use a different port for RDP. I remember in my MSP days that it was important to change the port away from the default of 3389 for security purposes. Knowing that some blocks of ports shouldn’t be used, but not knowing which, I once again turned to Google. An answer from Stack Overflow gave me the answer I needed:
Stack Overflow – Best TCP port number range for internal applications
- System Ports (0-1023): I don’t want to use any of these ports because the server may be running services on standard ports in this range
- User Ports (1024-49151): Given that the applications are internal I don’t intend to request IANA to reserve a number for any of our applications. However, I’d like to reduce the likelihood of the same port being used by another process, e.g., Oracle Net Listener on 1521.
- Dynamic and/or Private Ports (49152-65535): This range is ideal for custom port numbers.
Dynamic/Private sounds the best, but realistically, User Ports are better. The former is sometimes used by the OS or applications for ephemeral purposes and I don’t want to run into an issue where something is using my RDP port temporarily, blocking my access. I selected a random port number in the User Ports range that wasn’t known to be used by any applications by the IANA.
After setting up XRDP, I attempted to use Windows’ RDC to connect…and it failed. All I saw was a black screen momentarily, before the RDP connection close. Apparently that’s because XRDP only works when if the user account is signed-out locally. I’d forgotten that RDP isn’t like a “virtual KVM” like TeamViewer or ConnectWise. RDP actually requires signing-in to the user account and starting a new session. And obviously an account can be signed-in one place at a time. Same as Windows RDP.
Once realizing that and signing out Ubuntu via ESXi, I was able to sign-in!
So now that almost unrelated journey was over, it was time to get to the meat: setting up that bash script.
Task 2 – Running the Dreamhost Dynamic DNS Script
I’m not going to go through all the instructions since the script’s GitHub page lists them, but I’ll just briefly tell of things I got stuck on and how I got around it.
The command syntax is listed as
dynamicdns.bash [-Sd][-k API Key] [-r Record] [-i New IP Address] [-L Logging (true/false)]I had already created the API key in Dreamhost and the new A Record (with a “fake” IP address) that I wanted the script to update. So just plug and chug at this point. The instructions for the -i flag said that if it was empty, the script would automatically use dig to find the external IP of the network. That’s obviously what I wanted since my home IP address could change. But then it kept giving me an error that the flag required an argument.
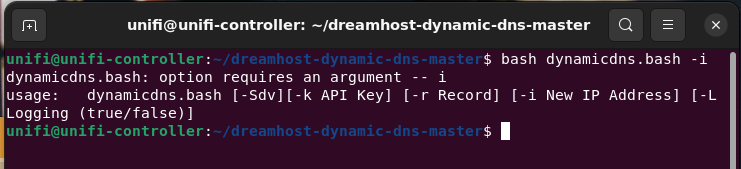
Eventually, I tried not including that flag and it appeared to succeed! I checked out the DNS on the Dreamhost panel and the IP address was now showing my external IP. I tried updating the DNS with either various IPs via the script a few times to make sure it was working, and each time the A Record listed in the Dreamhost DNS showed the IP address I used.
Future configuration changes can be made in the config file that the script creates when it’s first run, instead of the command line. However, I couldn’t find where that was at first; it wasn’t in the same directory as the script itself. Reading through the script itself, it seemed that it created it in a hidden .config directory in the user home folder. The config file is conveniently called dynamicdns.
Naturally, I don’t want to have to manually run the script each time. The whole point of using DDNS services is that it’s periodic and automatic. If I have to run the script every time myself, might as well just forget all this and make the change manually in the DNS! Time to set up a Cronjob.
Task 3 – Automating via Cron
I’ve messed with Cron exactly once before. I can’t even remember why I did it and, therefore, didn’t remember how to use it. I followed this guide by Digital Ocean to install Cron (wasn’t sure if it was installed already). I chose to use nano as my editors because my experiences with vi have not been great.
Cron requires a schedule and the command or thing to run. I wanted to have the script run hourly, so that if my home IP did change, it’d get picked up relatively quickly (ignoring any delays in DNS propagation). Trying to understand how to format the schedule can be challenging…so back to Google, where it found the Crontab Guru.
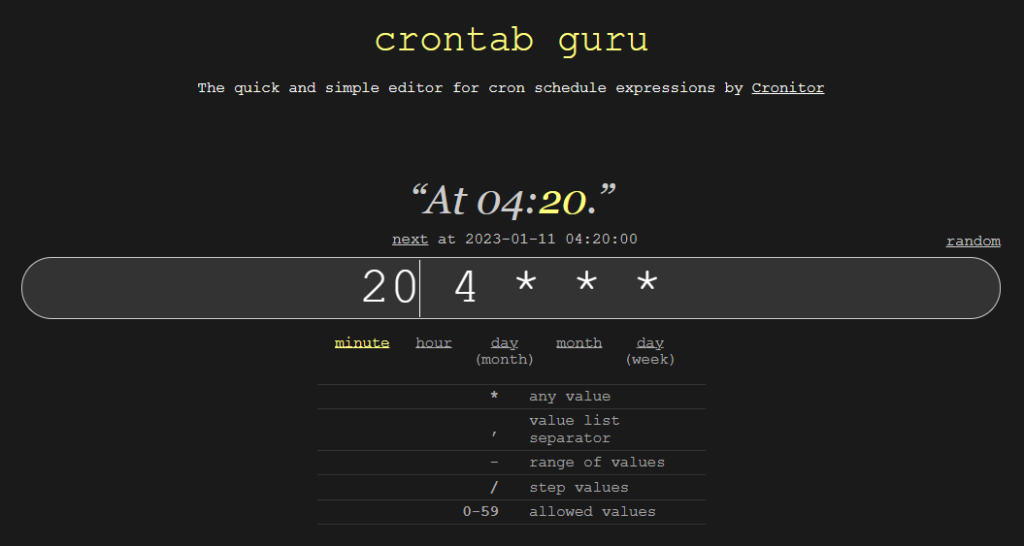
Playing around with guru helped me better understand how the scheduling syntax worked, as opposed to reading examples. I quickly found that running the command hourly could be done with:
0 * * * *Now all I needed was the command. Given that it was a bash script, I knew I’d need to use bash, followed by the path of the script. But what was the path of the script? It was in a subdirectory in my home directory, but what’s the path? I noticed that a lot of cron examples had something like ~/bin/filehere. What does the tilde mean?
Apparently it means the home directory. So after playing around a bit and testing—I set the schedule temporarily to run every 5 minutes and set the A Record IP to something else—I figured out the correct path after noticing the IP address in the DNS finally changed. This is what the complete cronjob looks like:

~/bin/All Done! Maybe?
Well, no. This was all done just so I could set-up VPN access via the Unifi Controller. Which is set up, but I haven’t had a chance to test! It’s late and I’ll be in the office later this week, so I’ll try it out then.
Even though this was just prep work, it was good opportunity to play around with Ubuntu and Linux more, in particular the CLI. I recently expanded size of the Ubuntu VM and had to do a little bit of CLI work, but it really wasn’t that much. And I can’t imaging I’ll be doing that very often. Before this, I think the last time I played around in Terminal was when I was setting up the Unifi Controller as a service, via systemctl. So not a whole lot of experience collectively, but I’m hoping to do more stuff like so I can get better acquainted. That’s what a Homelab is for, right?
I’ll report on the VPN at later date.