Homelab Chronicles 16: Simplifying Dynamic DNS

It’s been sweltering in the DC area. For most of the past week, we’ve had a “heat dome” over the region, meaning it’s gotten to around 100F (37.7C) multiple days. Coupled with high humidity—it’s been a rainy summer so far—that means I’ve been running my AC regularly. It is summer, after all.

In past years, back in Kansas City, I would sometimes turn off my server (!) in order to save on electricity costs.

Let’s face it: I don’t do that much with my server. Yeah, it hosts my DCs, long-term storage, and some other services, but the reality is that I don’t really touch it that much. The computers I use regularly aren’t even domain-joined. I rarely go through my old music and movies/shows collections. And some of the services that used to be hosted on my server have been taken over by other devices.

On that last point, two come to mind: the Unifi Controller and WireGuard VPN. Unifi is now hosted on my Cloud Gateway Ultra. I had to host it in a VM when I had my old USG in place, but the UCG completely replaced that.

The same goes for Wireguard. I mentioned in Homelab Chronicles 11 that I set up WG-Easy within a VM. About a month ago, however, I set up Unifi Identity and a Wireguard server in the Controller. I’ve been testing that out with some of my devices and it’s been great. I have a couple of other devices where I need to switch the WG config files out, but once that’s done, I can sunset WG-Easy.

Related to hosting a VPN, is making sure Dynamic DNS is set up and working. I spoke about this in Homelab Chronicles 09. No matter where my VPN server is here at home, I need to know the IP address. With a dynamic, albeit “sticky,” IP address, the easiest way to do this is with a domain and DDNS.

Many home routers have a DDNS client built-in, and Unifi gateways are no different here. And there are plenty of registrars and DDNS services it can work with. My domain is hosted at Namecheap, which is one of the services Unifi can work with. Unfortunately, I point it to nameservers at Dreamhost. That’s where this blog is hosted!

I could move the DNS back to Namecheap, but with this site and email, I’d rather not. So what to do? I want to stop doing DDNS from my server, but don’t want to move the domain’s DNS to a compatible service.

Well, there’s where money comes into play. Yes, that’s right, cold hard cash to the rescue.

I bought a new domain at Cloudflare. Spent a whole $7.50, which rises to $11/yr after the first year.

Afterwards, I put the domain details and API key into Unifi. Then about a minute later, I checked the DNS at Cloudflare, and behold! My home IP address as an A Record!

I still need to update the existing individual WG config files on each device by changing the server address to my new domain. Then I need to test it by seeing if I can connect. But I’m not expecting any issues; I’ve done this before a few times with work VPN config files.

Once I’ve confirmed everything is working, I can turn off WG-Easy and stop my current DDNS cronjob. And that should be the last external facing service. I can power down my server until I need it again.

Anyway, that’s it. Nothing super technical today. My point with this post is that sometimes spending a little money can be the quickest solution. I probably could’ve spent a couple hours working on trying something else. Like moving the DNS isn’t difficult, but it can be tedious and delicate, especially with DNS propagation. With long TTLs, it can potentially be awhile to see if the migration worked properly.

But spending about $10/yr will have saved me a decent amount of time and effort. I can’t always spend money to solve problems. Some solutions might be too costly. Though this is a case where it made the most sense.

Lastly, I decided to go with Cloudflare instead of Namecheap, where my other domains are hosted, mainly because I’ve never used Cloudflare before. I know Cloudflare provides some DDOS protections, but I’m not really expecting to ever have to utilize those. It was also slightly easier to configure in Unifi and it was cheaper.

OK, time to test.

Homelab Chronicles 15: Three VLANs to Rule Them All

I finally split out my IoT devices onto their own VLAN. That’s it that’s the post. See you all next time!

No, of course I gotta say more. I’m a wordy MFer, after all! But yes, I finally put the IoT stuff on its own network. I should’ve done it a long time ago. It’s been on my list of Homelab to-do’s for like 4-5yrs. A good chunk of not doing it was because I wasn’t sure how to implement it.

I had experimented with VLANs a couple years ago, then doing some basic firewalling to make sure the VLANs and the devices on them couldn’t communicate. I set up a couple VLANs and then created an “RFC 1918” firewall rule to disallow communications between VLANs and their associated subnets. I even have a couple ports tagged on my switches for network isolation purposes.

Lately at work, however, I’ve had some opportunities to play around with and troubleshoot some of the network and firewall issues. So with that better understanding of the Unifi Zone Firewall Policies, I finally pulled the trigger.

I guess I’ll start from the beginning, explaining the three main VLANs I have:

  1. The Default/Main VLAN. This has my computers, consoles, phones, etc.
  2. The Guest VLAN. This one is attached to my guest WiFi, naturally. Device isolation is enabled here.
  3. The IoT VLAN. This is my smart plugs, WiFi bulbs, Google Nest devices, TVs, etc.

The reason for separating the IoT devices from everything else has to do with security. Some of these devices are cheap smart plugs and even smart bulbs. Some of these are from overseas companies I’ve never even heard of before. That’s on me for using these instead of stuff from a more reputable brand, but still. Who knows what any of these devices are doing or watching on the network. I’ve mentioned before I have some Google Nest devices. Are these snooping on my network, sending network usage patterns back to Google? Who knows.

Anyway, most of these IoT devices require WiFi. So I created a new WiFi SSID and attached the IoT VLAN to it. I don’t necessarily know if it increases security, but I also set it as a hidden network. At the very least, since I live in a sizable apartment complex, I didn’t want to further clutter up an already cluttered SSID list. That said, there are one or two devices that are wired, such as TVs. For those, I had to tag ports on the appropriate switches. That’s one area I would like to play with more: port tagging. However, since I’m using some of the more basic Unifi gear, there are some limitations.

Fom there, I merely had to place the networks in the correct zones. I created a new IoT zone and then moved the IoT VLAN into it. My Main network is in the out-of-the-box Internal zone. And when I created a Guest WiFi network, Unifi automatically placed it in the Hotspot zone, with the proper firewall rules to isolate the network (devices on the Guest network are also isolated from each other).

By default, user-created zones in Unifi are automatically isolated from other networks (though they’ll always at least have Internet access, which is in the External zone). So creating the IoT zone did most of the work for me. I didn’t have to create all these rules to isolate it from other zones. However, I wanted devices in the Internal zone to be able to communicate to devices in the IoT zone. Two reasons for this:

  1. If I lose Internet access, I want some limited control over IoT devices. I don’t want to have to press the power button on my smart switches if I want to turn them on/off; I want to be able to use my phones and apps.
  2. I have a Chromecast and a few other devices that I can cast media to. I moved those devices to the IoT VLAN, but of course my computers and phones will remain on the Main VLAN.

However, if a device is communicating “down” to devices in the the isolated IoT VLAN, there needs to be some ability to communicate “up” as well. If I ping from Main to IoT, that only works if IoT can respond back. But I don’t want to devices from IoT able to initiate and maintain connections to Main.

Luckily, Unifi makes this easy—though I had to ask around and play around a lot to figure this out.

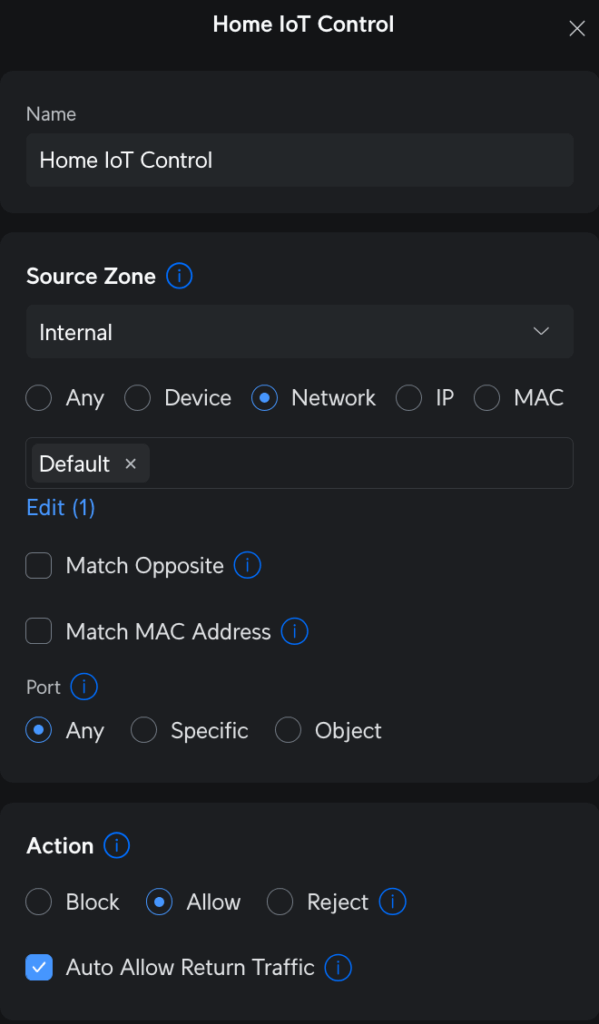
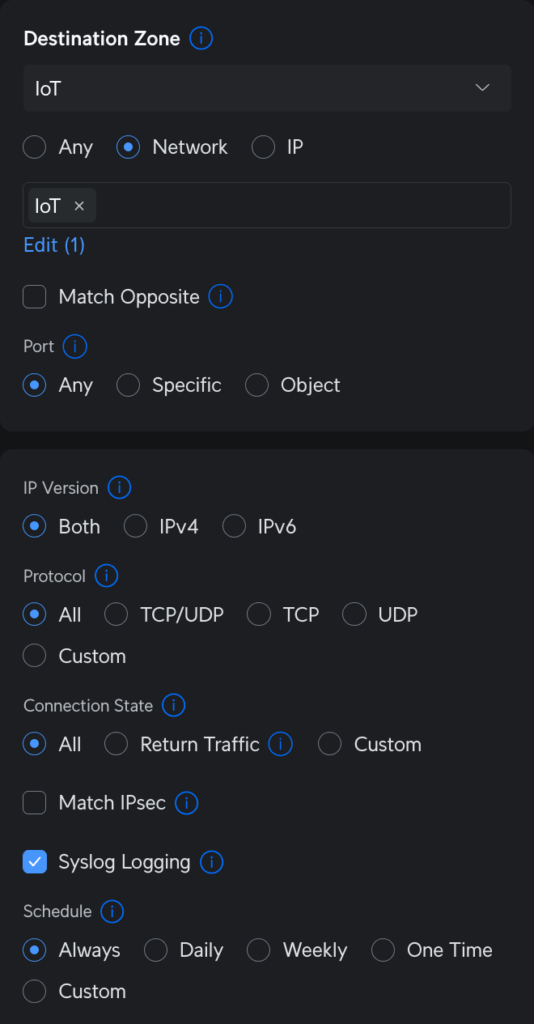
One single rule in the “source Internal, destination IoT” part of the zone matrix can be made to allow this behavior. On the source side, I selected the Main (Default) network in the Internal zone to allow connections on any port. On the destination side, I have the IoT network in the IoT zone. The most important thing here is, on the source parameters, that checkbox to “Auto Allow Return Traffic.” When the rule is saved, that checkbox creates a corresponding partner rule in the “source IoT, destination Internal” part of the matrix to allow only traffic from IoT only if Internal initiated first.

Essentially, I can ping from Main to IoT, but I can’t ping from IoT to Main. This works because the “bottom” rule, or broadest firewall rule, in the IoT zone, disallows traffic to/from any other zones. Like I said before, that’s Unifi’s default behavior for new zones. My rule creates an exception to the policy.

I tested everything out afterwards, and the results were mixed. I disconnected my network from the Internet to see how different applications would react. From my cell phone (also only on WiFi), I could easily still control the smart plugs, which is exactly what I wanted.

But the media casting wasn’t as successful. The Chromecast seemed to accept casting from a computer via direct network connection, but Spotify on my phone didn’t quite work with my Google Nest speakers without Internet. Not ideal, but I don’t cast that much anyway. The main thing is controlling my lighting.

With this finally done, I feel like my basic network setup is essentially complete. There’s always more that I could tweak. For example, I have a printer. Maybe I put the printer on its own VLAN and allow any device in any network the ability to print to it. Right now, it sits in the Main VLAN with my computers. I don’t have that many guests, so it’s really NBD.

But for now, this is good. Time to move onto something else.