Homelab Chronicles 13: A Year in Review

As I said in my last post, I recently moved. Which mean that all the work I did in my last apartment is gone. That was mostly physical infrastructure work, particularly the cabling. So now I get to do it again; joy!

But before I get into the new place, I should visit some topics from the past. An update of sorts. Just because I haven’t posted in a year doesn’t mean the homelab has sat untouched for a year.

UPS Delivered!

Back in April, I finally bit the bullet. I bought a “CyberPower PFC Sinewave Series CP1000PFCLCD – UPS – 600-watt – 1000 VA.” I wanted something that would communicate with ESXi to initiate a “semi-graceful” auto-shutdown if wall power was lost.

PowerPanel dashboard, showing the UPS status as normal and full charged.

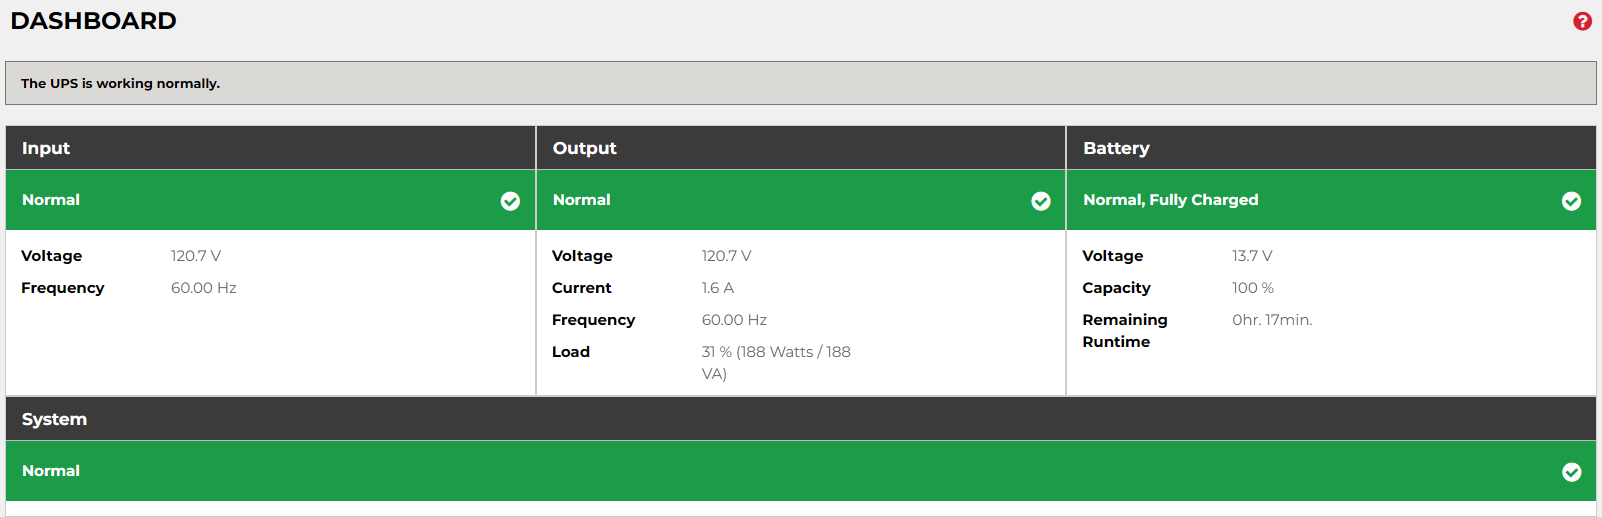
I say “semi-graceful” since with my setup, I only have ~17min of battery life. That covers three devices: my server, my Unifi Secure Gateway (USG), and a 5-port Unifi Flex-mini Switch.

Via the accompanying PowerPanel software, I can monitor battery status, while also configuring the shutdown behavior in for ESXi. I actually have PowerPanel installed as a separate VM in ESXi. Probably not the best idea, but it works.

Back to the semi-graceful shutdown, VMs sometimes take time to properly shutdown, especially Windows Server. So between ESXi and PowerPanel, I give some time for the VMs to gracefully shutdown. But if they don’t shutdown in time, then ungraceful shutdown of VMs occur, before ESXi gracefully powers down.

Took a bit of testing to get it all figured out, but it does work. At my last apartment, there were a couple of brief blackouts or brownouts. The UPS did exactly what it needed to do.

My (Home) Assistant Quit on Me

The very last post of 2023 was me futzing around with Home Assistant. I had a “concept of a plan” to automate some of my smart home devices.

After getting it installed, though, I didn’t really do much more with it. Stupid, I know.

Unfortunately, at some point towards the end of 2023 or beginning of 2024, the HAOS VM bit the dust.

“Failed to power on virtual machine…File system specific implementation of LookupAndOpen[file] failed.”

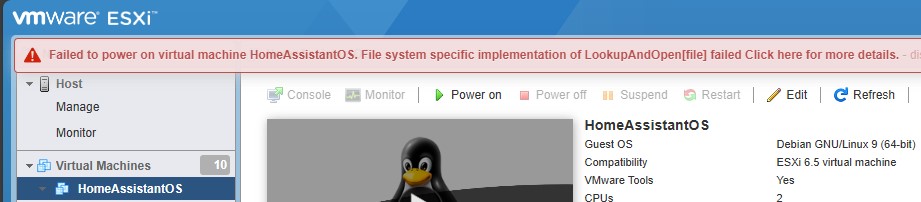
I don’t exactly know what happened, or when it happened. But I know there was a power outage one night. A storm, I think. Before I had my UPS…

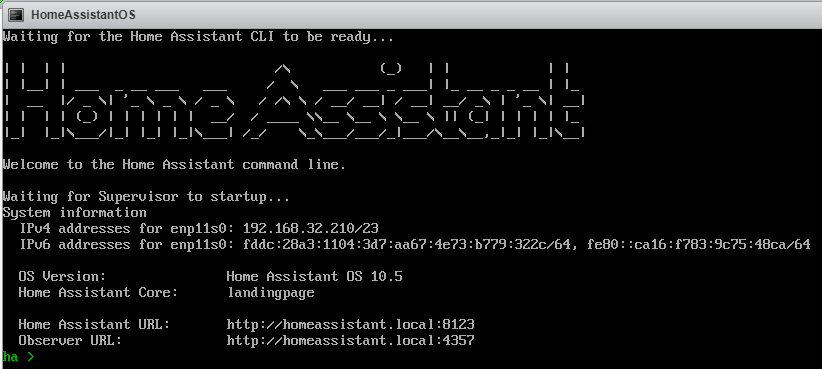
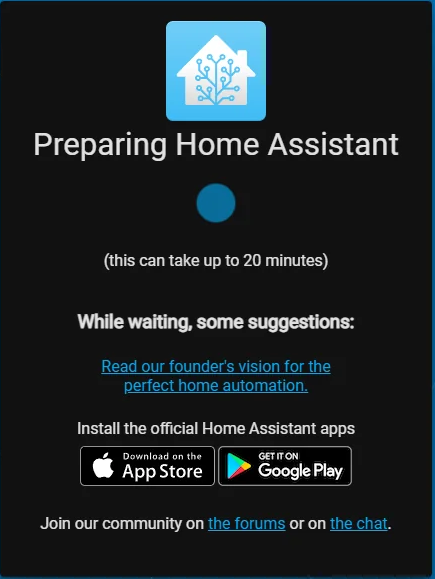
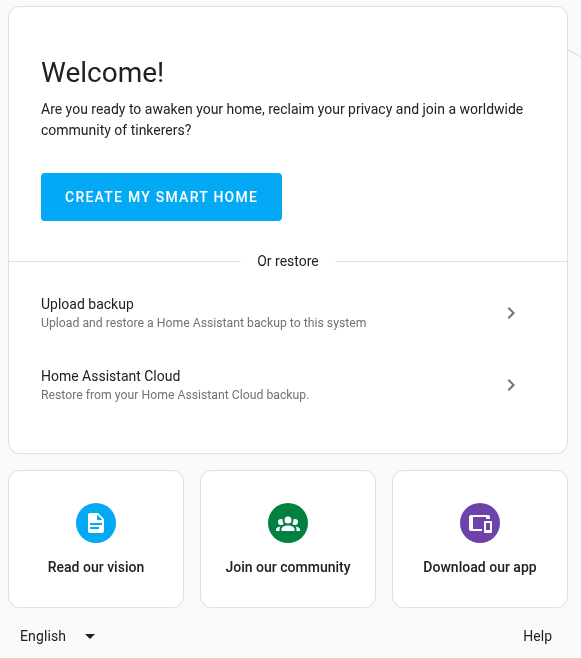
I can’t say for certain the power outage was the reason. After all, it was at least a couple weeks later that I realized HAOS wasn’t turned on. When I tried turning it back on, I got that message, and have ever since.

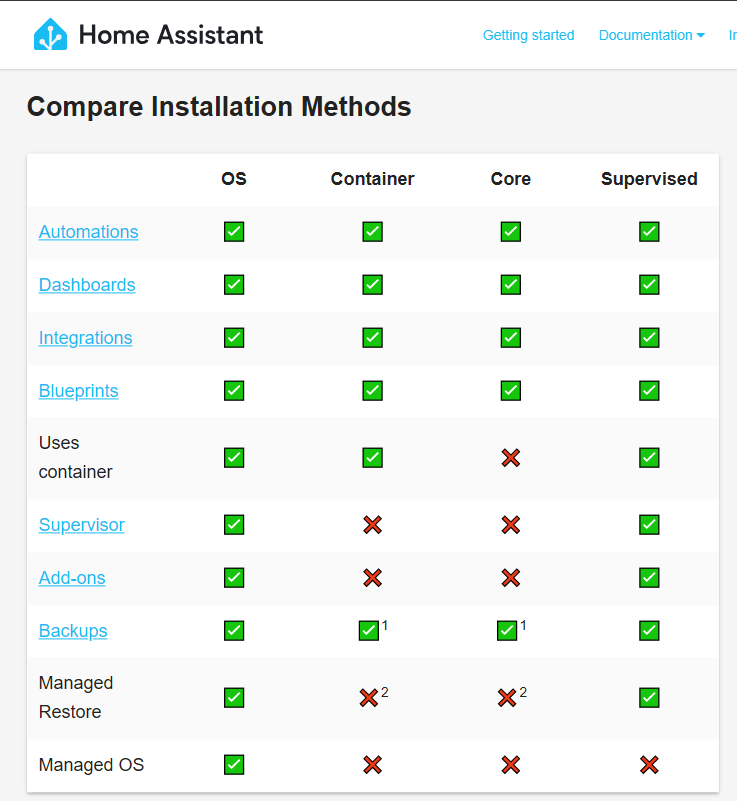
I did look into this error message a little bit. But I think reinstalling HAOS is the better choice. Especially since I didn’t do any further setup anyway.

Glad I have the UPS now 🙂

Playing with Proxmox

Over the last year or two, the big news in the virtualization space is VMWare selling out to Broadcom. And Broadcom absolutely trying to squeeze out every last penny in licensing. Recently, AT&T disclosed that Broadcom was seeking a 1050% price increase on licensing.

I’m still using ESXi/vSphere 6.5 U3 on older than 10yrs old server. Which is fine, but at some point I’ll need to replace the hardware and software. Unfortunately, there are no more perpetual, free licenses for non-commercial purposes. I never even got a 7.0 license.

With that in mind, I thought it’d be interesting to play with Proxmox, which is a FOSS virtualization platform. As such, I installed it on another server I had lying around. Unlike ESXi, Proxmox is nowhere near as user friendly. And the documentation that’s available is pretty poor, in my opinion.

That’s one of the reasons FOSS sometimes annoys me: it’s often not very accessible to anyone who’s not already an expert. But that’s a topic for another post.

The first thing I wanted to do was connect my current NFS-based OS ISOs storage to Proxmox. This way, I wouldn’t have to use extra drive space on the new Proxmox server by copying over an ISO. If the data exists on the network, use it! This NFS share is hosted on my primary Windows Server VM.

I was able to point Proxmox to the NFS. However, Proxmox wanted to use its own directory structure within that NFS. I found that rather annoying. This wouldn’t be where the Proxmox VMs live, after all. It’s simply where the ISOs are. Why should I have to rearrange the directory structure and files just for Proxmox?

I honestly don’t remember if I created a VM after all that. I don’t remember if it worked or not. But given the situation with VMWare, that won’t be the last time I play with Proxmox.

Let’s Get Physical, Physical (Again)

The last thing to report is minor, but worth mentioning. I ended up adding two more Ethernet runs. The important one being from one room to another, underneath the carpet and along the baseboards. Ah, the joys of apartment living.

Anyway, that’s not that big of a deal. I had already done it once, after all.

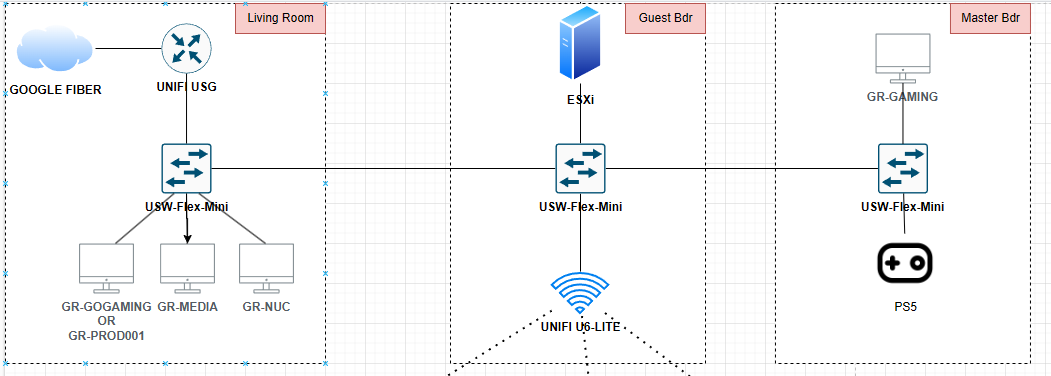
Rather, it was the idea that led to this. In my old apartment, the Google Fiber jack (ONT) was in the living room. The guest room down the hall served as the “server closet.” The server, Unifi AP, main switch, UPS, and other devices were in the guest room. But the Unifi Secure Gateway (USG) was in the living room, since the Internet point of entry was there. Which seemed strange to me. I wanted all the main gear in the guest room.

It’s hard to explain without a map or diagram, so I’ll use some. This is the diagram of my original layout:

My original setup at my last apartment. Simple, if not a bit overkill.

To move the USG to the guest bedroom, there were two ways to achieve this. One was by adding a second run from the living room to the guest bedroom. One run would connect the fiber jack to the WAN side of the USG. The other run would connect from the LAN side of the USG back to the switch in the living room.

But I wondered if it was possible to do this:

Note that the USG doesn’t have that many ports; I forgot to add a second switch in that room, but the idea still stands.

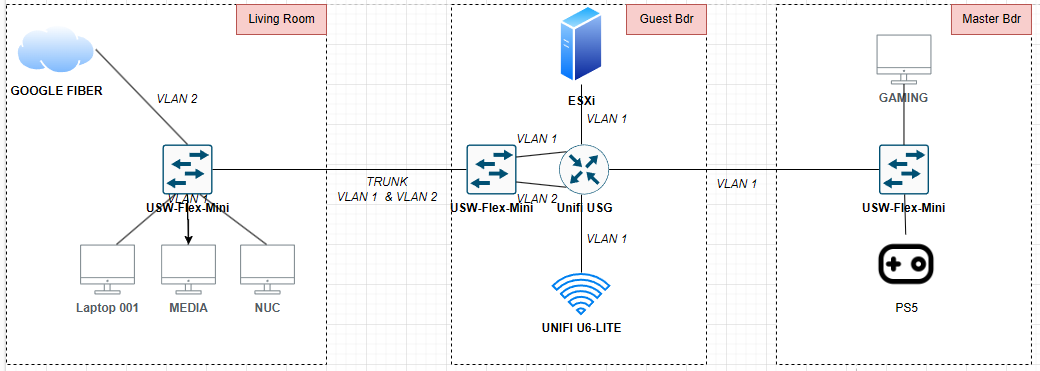
Essentially, could a WAN connection go through a VLAN? Because if it could, I wouldn’t have to run another cable. I looked it up and even asked on reddit. And the answer was yes, this is entirely possible and not that unusual!

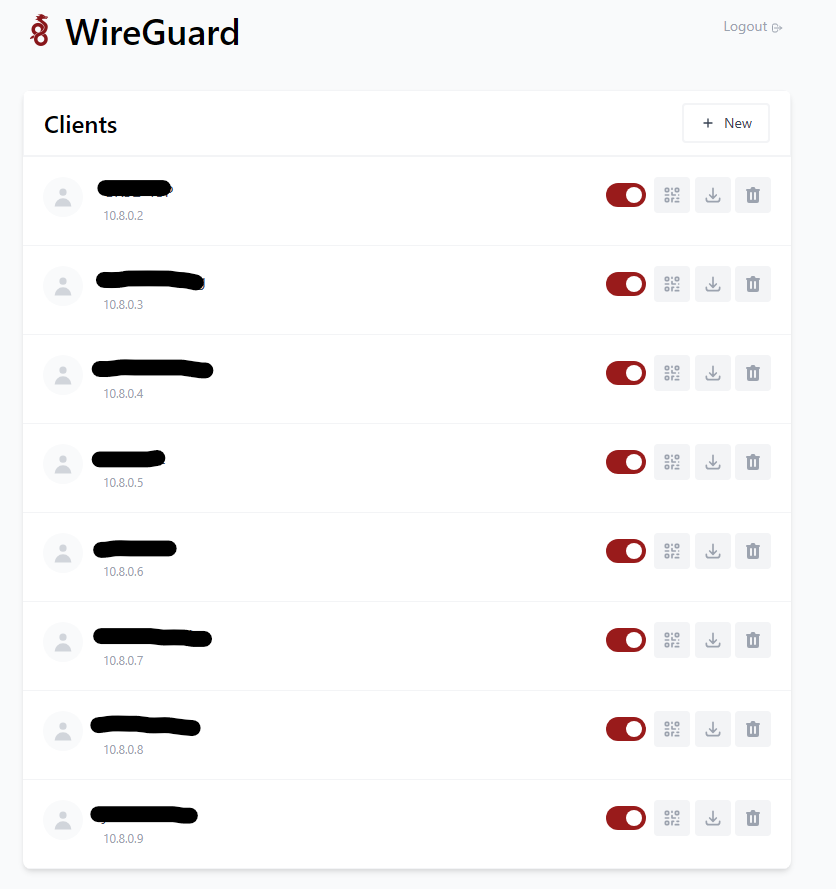
Unfortunately, when I tried to do this, it didn’t work. It even caused me some more issues with the Unifi controller being inaccessible while it wasn’t working.

In the end, I just laid a second down a second Ethernet run. Maybe I gave up too quickly, but sometimes the easiest solution…is simply the easiest solution 🤷‍♂️


So that was last year in the life of the homelab. Not as much as I wanted to do, but it was at least something. And that’s the point, right? To at least play around with it and learn something.

From Kansas City to D.C.: A New Chapter Begins

Wow, the last time I actually published an article was October 1, 2023. As I’m typing this, it’s September 28, 2024. Almost exactly a year. That’s not to say I didn’t try to post. I have a couple of drafts sitting on the shelf on the back, but I just lost steam with them.

So it’s been a year—What’s new?

A lot. I’m no longer in Kansas City; I’m in Washington, D.C.

Well, in the “DMV” anyway. I don’t actually live in D.C. proper. Regardless, I moved here about 5 weeks ago.

It was at least a 16 hours drive. We—my dad and brother—did it over two days. I flew them into KC to help me. We left on a Saturday around noon and drove the moving truck and my car east along I-70. Terre Haute, Indiana was the goal for that evening. The next morning, on Sunday, we did the remaining roughly 10 hours drive to D.C., arriving just before midnight.

Google Maps screenshot, showing the long route literally halfway across the country.

That was quite an awesome drive, especially once we got to eastern Ohio and started driving into the Appalachians. While not as majestic as the Rockies, I think the Appalachians are far more picturesque. Once the sun started setting, the shadows of the mountains on each other created these awesome silhouettes. The mountains looked illustrated.

It was a much more relaxing drive than I thought it was going to be. Cheaper, gas-wise, too. But the rental truck itself was like $2200, so…

But why did I move to D.C.? I got a new job! I left the non-profit sector for a sorta different kind of “non-profit:” The Government 🦅

I’ll still be doing IT, but in a somewhat different manner than I was doing in my last role. It’s tough right now as I don’t fully know what my role is. And at times, it seems my employers don’t know either. But I’m sure it’ll come together. It’s only (“only”) been three weeks since I’ve started, after all.

Is this a dream come true? No, but both moving to D.C. and getting a federal job were goals of mine. And now I can cross both off! I liked Kansas City, having lived there for about 30yrs total, but it was time to go. I was the last of my family members to leave town, so there was really little reason to stay.

Unfortunately, I’m now even farther away from my family since they live in Las Vegas! My flights used to be about three hours from Kansas City to Vegas, if non-stop. Now I’m likely looking at five hours or longer. I imagine I won’t be visiting my family as much, which is certainly a bit sad. But it is what it is.

My goal is to eventually get a full remote position with the government. Just like my last job was. If I can make it a year here, I think I’ll start looking around for something else within the government.

On the tech front, I obviously had to pack up my server and network to move out here. Once I got here, I had to set it back up. Which I just did this weekend. I think I’ll explain more in a separate post.

I can’t say I’ll have more free time than I had before—It’s a hybrid role, so I’m back to commuting. But I am looking to get back into messing with my homelab. So hopefully I’ll post more things here. Even if write one blog post a month, I’ll be happy.

Homelab Chronicles 12: I Need a Home Assistant

I’m lazy. To the point where I don’t even want to get up to turn off the lights. Thank god for Internet-enabled home automation.

I started with smart plugs — which I’ve had for several years now — then expanded to Google Nest devices (“Hey Google, turn off my lights!”), smart bulbs, and an Ecobee thermostat. I even have an indoor security camera, but that’s not really a part of my automation. Still an IoT device though. Anyway, these are all different brands: Google, TP-Link Kasa, Ecobee, Tuya, etc. Luckily, home automation has evolved to be pretty open. As in, I can control everything from Google Home on my phone. I have the separate apps for each brand, but I do tend to mainly use Google Home. It works great; only the security camera still needs its native app for me to view the live feed or recordings.

Though with the continuing and increasing rate of “enshittification of the Internet,” I thought it might be a good idea to ensure that my home devices don’t have to rely on the “goodwill” of these companies and their clouds. Just because controlling my smart plugs from anywhere in the world is free today, doesn’t mean it can’t be a paid subscription tomorrow. Looking at you, BMW, and your heated seat subscription.

Home Assistant logo

Enter Home Assistant. I’d been hearing about Home Assistant for some time now, on reddit, Lemmy, Tildes, etc. I also have a couple of friends who use it, too. So I thought I’d finally give it a try.

I’ll probably break this up into a few parts, since this will be an on-going project to get everything working properly and the way I want. Home Assistant can be a very powerful automation hub, but it’ll likely require a lot of configuration and tinkering. I need a plan.

The Plan

  1. Install Home Assistant. Find out what the hardware requirements are and what I can run it on. I have a server (or three…though only one is ever running) plus many other spare or backup computers lying around. So I have options.
  2. Add all or as many of my IoT devices that I can. Some basic research shows that all the brands I use have integrations with Home Assistant.
  3. See what can be controlled locally. Hopefully everything! If I lose my Internet connection or the cloud is no longer free, will I still be able to control my devices? Right now, that’s not the case with all my devices. That’s the main reason I want Home Assistant: local control.
  4. Create the automations. My automations are simple: lights, via the smart plugs, turn on and off at certain times. My Ecobee thermostat has standard programming options of if temperature hits X, then do Y. But maybe there are more advanced things I want my devices to do. I’ll find out what’s possible.
  5. Remotely access and control Home Assistant from wherever I am, so long as I have Internet access. I can do that now via Google Home and the various native apps. Can I do this with Home Assistant, given that it’s installed locally? How can I do this securely? While my thermostat and camera are what I mess with the most when I’m out and about, I do sometimes turn lights on and off. This is especially true when I’m out of town.

The Installation

This did not go smoothly. Home Assistant — I’m going to use HA or HAOS from here on out — has many guides on installing the system, with several different routes one could take. Which is great, but I also feel like the guides aren’t as complete as they should be and are inconsistent.

I initially wanted to install HA on my Ubuntu Server VM. It’s getting a bit loaded up with stuff — the Unifi Controller, DDNS stuff, Docker, and Wireguard — but thought it’d be fine. However, I quickly realized that HA is mainly a standalone OS. There are other versions, but HAOS is the recommended one.

Chart on their installation page showing the different versions/methods available.

OK, no problem. I can install it on a NUC I have lying around. Or better yet, I have ESXi on my server; just a matter of creating a new VM. This is where it started getting confusing. Rather than just showing me an ISO, there was an option for installing on a Generic X86-64 bit machine. That’s what I wanted right? A VM is just that; just not physical.

Attempt 1: Generic X86-64

I downloaded the specified img.xz file, extracted the IMG file with 7-ZIP, uploaded it to my ISOs datastore in ESXi, and then created the VM. One important thing was to make sure the VM loads with EFI instead of BIOS. After setting it to EFI, I loaded the IMG in the virtual “CD Drive.” I’ve done this several times, to install Windows/Windows Server or Ubuntu as VMs.

Except that didn’t work. It was like booting without boot media. Nothing happened. The instructions were for a bare metal installation, burning the IMG on to a USB stick using something like Balena Etcher. Since this was a VM, I skipped all that. There’s no “virtual USB stick” needed here; that’s what the IMG file is. I tried a couple more times from scratch, deleting the VM and then recreating it, and it still didn’t work. I even tried mounting the IMG on my local machine; wouldn’t mount. I wasn’t sure what was going on there.

Attempt 2: Using an OVA/OVF in ESXi

Undaunted, I tried a different method. One of alternative methods. Hey, it even mentions ESXi here! Wish I’d seen that beforehand. I downloaded the OVA file (never used one of these) and then used the option in ESXi to “Deploy a virtual machine from an OVF or OVA file.” I selected the OVA file I downloaded and it was uploaded to ESXi. It was successfully created and I started the new VM.

It booted properly and began loading up. All was looking good, until I started seeing some warnings and errors. They were similar to this. And it just kept looping. I tried rebooting the VM a few times, but it kept giving the same error. It never got to completion.

After deleting the VM, trying again with the OVA file a few times, but getting the same error, I was getting very frustrated. This was still only the installation!

Attempt 3: Using a VMDK in ESXi

Finally, I found a guide on the HA forums on how to install HAOS on ESXI 6.7 (I have 6.5, but the versions are basically the same). This one references a VMDK file! I’m more familiar with those. I did eventually find where to get a VMDK under the Windows or Linux install instructions. I guess for those two platforms, the idea is to be running HAOS in VMware Workstation. Why a VMDK isn’t also linked in the alternative methods guide, I don’t know. Or more importantly, why isn’t this forum post part of the official methods?

Either way, it finally booted to completion, and the lovely HAOS “banner” showed in the VM’s virtual console.

Installed and running!

It took me 2 hours to successfully install and boot the OS. But now that part was done! Now I could start Onboarding with HAOS.

Delayed (On)boarding

I quickly typed in the the .local address into my browser, to get to the Web UI. After fiddling with some browser settings (I had a browser-based VPN option enabled for “securing” non-HTTP sites, which I had to turn off), the page loaded!

Except the system was still “preparing” and could “take up to 20 minutes.”

More waiting?

What? What kind of preparation takes 20 minutes? OK, whatever. I left it up on another screen while I went back to whatever else I was doing. After at least 20 minutes of still seeing this screen, I was getting worried again. Luckily, clicking that blue dot showed a log.

This is what I found, repeated over and over:

23-09-30 02:49:30 ERROR (MainThread) [supervisor.misc.tasks] Home Assistant watchdog reanimation failed!
23-09-30 02:51:30 WARNING (MainThread) [supervisor.misc.tasks] Watchdog miss API response from Home Assistant

A quick Google Search led me to a GitHub issue where others had been reporting a similar problem. Luckily, it was a fairly recent post; the initial issue was reported only 3 weeks ago (at the time of this writing).

There were a couple potential solutions there, including trying to install HAOS 10.4 — I was using 10.5 — and then updating. But one that seemed to take the least effort was to simply…wait it out. A few people mentioned that after waiting a bit, the system eventually did what it needed to do and would be ready for input. For some, it took 15 minutes, while others waited hours.

One project contributor even mentioned what was going on:

tl;dr: The errors are a bug in Supervisor, but download should continue despite the errors. Usually you just have to be patient while Home Assistant OS downloads the latest version of Home Assistant Core (which is around 1.8GB at the time of writing).

The details:

When first starting Home Assistant OS, the Supervisor downloads the latest version of Home Assistant Core. During that time, a small replacement for Core called landing page is running. It seems that the Supervisor does API checks for this small version of Core as well, leading to this messages:

23-09-26 10:33:48 WARNING (MainThread) [supervisor.misc.tasks] Watchdog miss API response from Home Assistant
23-09-26 10:35:48 ERROR (MainThread) [supervisor.misc.tasks] Watchdog found a problem with Home Assistant API!
23-09-26 10:35:48 ERROR (MainThread) [supervisor.misc.tasks] Home Assistant watchdog reanimation failed!

At first, a warning appears, 2 minutes later the first error appears. Both messages should not appear while the landing page is running, this is a bug in Supervisor.

If the download completes within 2 minutes, then non of this errors are visible. So this requires a somewhat slower Internet connection to show up.

Source: Agners on GitHub

While I was doubtful that this was some slow download issue — I have a gigabit Internet connection — I was frustrated and tired. It was already nearly 3:00am, and I really didn’t want to have to throw out this installation and try again or try HAOS 10.4. So I waited.

I didn’t go to bed; I was playing Final Fantasy XIV during all of this. But about 2 hours later, it finally did complete whatever it was doing, and I was prompted to create my smart home. I guess it was a slow download issue, probably on the other end.

Image Source: home-assistant.io

Stage Completed

It was around 5:00am when I finally called it quits. I had been working on installing HAOS for at least 5 hours. Which I found to be a ridiculous amount of time and effort to do something that’s typically fast and simple. I have things to say about that, but that’ll be for another post, another day.

As I mentioned at the beginning, I felt like the official instructions were pretty mediocre. They weren’t necessarily wrong, but rather lacking in details and information. Because of that, it led me down erroneous pathways that were wastes of time. Thank goodness for other users.

If you encounter any issues, the official forums, GitHub, and the official Discord server are very informative and filled with helpful people. Past reddit posts also provided some decent help or at least pointers. So far, I’ve been able to find the help that I needed. Not all projects or systems can say that, even with large userbases.

Anyway, Home Assistant OS is now installed, running, and waiting for me. The next step is to add all my devices, which will be in the next entry.

Homelab Chronicles 11: Whatever Happened to that VPN?

TL;DR: I’m using WireGuard. And it works perfectly. I’ve used it many times while traveling. I even picked-up a travel router — a GLiNet Slate Plus — and installed a WireGuard config on it, so that whenever my devices are connected to the travel router, they’re connected back to my home network. I’m also still using that subdomain for the VPN address that I set-up with DDNS.

It took me a couple attempts to get WireGuard working. Both relied on using Docker, at my friend’s insistence. I don’t really know how to use Docker — neither does he — so that became a huge impediment on my first attempt.

I found instructions on how to install WireGuard via Docker from linuxserver.io. And it worked! I downloaded a WireGuard client on my phone, installed the client configuration, and connected to the VPN. Connecting to the VPN is practically instant with WireGuard!

However, I only had that single config, which was shared across a couple laptops and my phone. While rare that I’d need multiple devices connected at the same time, it’d be impossible to do so with all of them sharing the same WG config. This, I believe, is because they’d all use the same private IP address, since WireGuard doesn’t have DHCP and instead assigns a static IP. Unfortunately, I couldn’t figure out how to create additional unique configs with that specific WireGuard implementation. Everything was done via CLI, and I’m already bad at using command line on Linux. Adding Docker to it all just made it 10x more confusing and worse.

So I tore it out. Almost literally, since I was so frustrated after spending several hours researching and trying things. Admittedly, I also recognize the irony here: my travel router shares its WireGuard VPN connection with all my devices connected to it, negating the need for separate, per-device VPN configs.

Anyway, I eventually found another WireGuard implementation called WireGuard Easy (WG-Easy). It, too, was installed with Docker. And, boy, was it actually easy! Having a Web UI made it real easy to manage.

Screenshot of my WG Easy Web UI, with several devices, each with their own private IP address.
Each of these devices has its own IP so they can be used all at the same time.

It’s just a few clicks to add a new client or remove one. I can even disable/enable a client via that red switch. Removing clients altogether is as simple as clicking the trashcan icon. It’ll even show me what devices are currently connected as it’ll show some basic traffic stats.

I do wish it had a more robust system for tracking those stats, historically. A log of when devices connected/disconnected would be nice too. But, hey, it’s called WG-Easy for a reason.

So yeah, the VPN is working fine. I’ve had no issues whatsoever since going to WG-Easy.

I would still like to have my VPN through my Unifi router. Mainly because then I could see all the devices connected to the network in one place. Since the VPN server is separate from the router, the Unifi Controller doesn’t see those devices, since the clients are on a separate subnet. But I’d need to replace my USG with something newer. And pricier.

I keep looking at the Unifi Dream Machine Pro…

A man can indeed dream.

Homelab Chronicles 10: Verifying the VPN and Failing

Having done all the prep work for the Unifi L2TP VPN, I was ready to test it out. I turned on my hotspot on my phone and had my laptop connect to it. Using the built-in Windows VPN client, I went ahead and put my VPN address in, username and password, and the pre-shared key. Then I hit connect.

And it connected! Quickly and on the first attempt!

Of course, that’s only half the battle. Could I reach local network resources? Would the VPN forward my web traffic?

Yes and No. Great.

At first, pings to local resources failed. But then I realized that I was still running a firewall rule in Unifi that blocked all inter-VLAN traffic. After I turned those rules off, those pings, including to the router and a Windows server, started working.

I could even connect to network drives—though only using the IP address, and not with a hostname. In a command line, I ran ipconfig /all, and the entry for the L2TP VPN adapter showed the correct namesevers for my network. Strange.

On the web front, it failed completely. In Edge (Chromium-based), trying to go to any website failed immediately. Even trying to go to ESXI’s portal, which simply uses an IP address failed. Same happened in Chrome and Firefox.

OK, well maybe it wasn’t getting out to the Internet. I tried ping 8.8.8.8 -t; that worked, so it was getting out to the Internet via the VPN. Then I tried pinging a domain, like espn.com or yahoo.com. Interestingly, it resolved the IP address and the ping succeeded.

I checked that all custom firewall rules in Unifi were turned off, not that I had many. And certainly none related to blocking web traffic.

Well, maybe Windows itself is doing some kind of firewalling. I don’t understand why it would appear to be blocking only Port 80 web traffic when connected to this VPN (I often use a VPN for work and Windscribe when travelling and they work flawlessly), but I completely turned off all firewalls. Still didn’t solve the issue.

At this point, I start scouring the Internet. It seemed like many others had similar issues, with even a few having basically the same problem. But there was never a solution or something that I hadn’t tried already or some configuration change that was applicable to me. A common problem was people who were on the same subnet locally and on the VPN. That didn’t apply to me since my phone hotspot was using a completely different subnet from anything I use.

I was starting to get annoyed. I had to refocus. What could it not be? Because the VPN actually did connect, it couldn’t have been the domain and DDNS stuff I was doing the other day. The username, password, and PSK were correct as well. It wasn’t any custom Unifi firewall rules that I had in place, since those only dealt with inter-VLAN routing and I turned them off, and was able to reach other devices on the network.

Could it be the computer itself?

I know the Windows VPN client is crappy. Though I’ve also used it before with other VPN connections and it was fine. But it’s always good troubleshooting to isolate the problem as best as possible.

That led me to pull out my aging 8-9yo Macbook Pro. I connected it to my hotspot, created a new VPN connection, set it to be highest in the network order, and also set it to route all traffic down the VPN, and then pushed the “Connect” button.

It connected. I tried pinging local resources; success. I tried connecting via SMB to local resources; success. I even opened a movie that I had stored on that network drive; it played. OK, looking good. Time for the moment of truth: I opened Edge and went to a website.

It loaded! I navigated to ESXI’s login page, which I connect to using an IP address. It loaded. I went through several of my bookmarks, went to YouTube, watched a video—it all worked!

But was web really going through the VPN? For all I knew, it could have been simply “falling back” to the regular WiFi hotspot connection. However, in MacOS, there are some colored bars that show when sending and receiving traffic is going through the VPN connection. And guess what? As I made requests in the web browser, I could see the bars lighting up, especially when traffic was inbound.

So I did set-up the VPN properly! It was working exactly how it should! But then why the hell was it not working on my main Windows laptop?

For good measure, I restarted the laptop. Then I deleted the VPN connection in Windows and remade it. It connected just fine, but like before, network resources could be reached, but not web traffic.

How about the VPN client? Maybe Windows’ client really is that bad and the culprit. I looked around for a third party client and someone on reddit recommended the Draytek Smart VPN Client. Downloaded and installed it. Entered in the VPN settings. It connected. But like before…Exact. Same. Thing. Happened.

Which leaves me here, after 3-4hrs of messing with this. I don’t understand why it works perfectly on MacOS, but far from perfectly on Windows. I don’t understand why local traffic, and even domain resolution for command line ping and tracert commands, work, but not web traffic. I don’t understand why Spotify “half-loaded.” Forgot to mention that. Like the items on the app’s home screen wouldn’t load, but songs I know I’ve never played and downloaded onto that laptop actually played.

So 3-4hrs later, I’m defeated. I’m frustrated. I don’t know what else to do or where else to look. Even Ubiquiti’s Unifi forums aren’t super helpful. Lots of really old posts that I don’t think necessarily apply here. YouTube had several videos on creating the VPN, but not addressing this specific problem. Reddit’s Unifi forum had plenty of questions, but no answers. I’m at a loss.

But I need a VPN solution. A friend told me about OpenVPN’s free Access Server service. I also have a friend who uses WireGuard and (mostly) swears by it. Some time last year, I did make an attempt to build a self-hosted OpenVPN server, though it was quite technical. I’ll start looking into one of those options.

Sigh.

Homelab Chronicles 09: Meandering in Ubuntu all for VPN

All I wanted to do was look into setting up VPN access on my Unifi USG. That’s actually pretty easy to do.

I set up a L2TP VPN in the Unifi Controller, no big deal. But then I remembered that I don’t have a static IP address at home. Like most households, I have a dynamic IP address. Of course, even dynamic IPs tend to be “sticky.” At my office about a year ago, I found out that our router was misconfigured and not using a static IP address like it was supposed to when VPN connections stopped working one day. But it had been like a year since it was initially (mis)configured! Sticky, indeed.

Same goes for residential; it’s not unusual for dynamic IPs addresses to last weeks or even months. However, I didn’t want to have to deal with my home VPN not working when I needed it due to “losing” my IP address.

Thank goodness for Dynamic DNS (DDNS). Fortunately, the Unifi Controller makes it easy to use DDNS services. Unfortunately, my host/registrar—Dreamhost, where this site is hosted—wasn’t included in the easy-to-set-up services list in the Controller. Typically for DDNS, if the router doesn’t have this function built-in, software can be downloaded that quietly runs in the background, periodically updating the DNS records with the current IP address. Dreamhost doesn’t have that though, because they don’t provide out-of-the-box DDNS service.

A quick Google search, however, revealed that some kind soul had created a bash script to run DDNS for Dreamhost. Which meant I’d have to host this on Linux. My Ubuntu VM that hosts the Unifi Controller seemed like a good place. No sense in spinning up another VM for something so lightweight.

This is where it snowballed. Mainly because I don’t have a whole lot of experience with Linux, especially in the command line.

Task 1 – Setting up XRDP

Whenever I need to go into that VM, I sign-in to ESXi and use the remote desktop in there. But it’s limited in resolution and sometimes ESXi signs me out. I needed a proper remote desktop program and have for awhile.

I use a proprietary RDP program for my Windows and Mac machines. But it no longer support Linux. Bummer. But Google tells me that setting up an RDP server for Ubuntu is pretty simple. By using XRDP.

The main change I did here was to use a different port for RDP. I remember in my MSP days that it was important to change the port away from the default of 3389 for security purposes. Knowing that some blocks of ports shouldn’t be used, but not knowing which, I once again turned to Google. An answer from Stack Overflow gave me the answer I needed:

  1. System Ports (0-1023): I don’t want to use any of these ports because the server may be running services on standard ports in this range
  2. User Ports (1024-49151): Given that the applications are internal I don’t intend to request IANA to reserve a number for any of our applications. However, I’d like to reduce the likelihood of the same port being used by another process, e.g., Oracle Net Listener on 1521.
  3. Dynamic and/or Private Ports (49152-65535): This range is ideal for custom port numbers. 
Stack Overflow – Best TCP port number range for internal applications

Dynamic/Private sounds the best, but realistically, User Ports are better. The former is sometimes used by the OS or applications for ephemeral purposes and I don’t want to run into an issue where something is using my RDP port temporarily, blocking my access. I selected a random port number in the User Ports range that wasn’t known to be used by any applications by the IANA.

After setting up XRDP, I attempted to use Windows’ RDC to connect…and it failed. All I saw was a black screen momentarily, before the RDP connection close. Apparently that’s because XRDP only works when if the user account is signed-out locally. I’d forgotten that RDP isn’t like a “virtual KVM” like TeamViewer or ConnectWise. RDP actually requires signing-in to the user account and starting a new session. And obviously an account can be signed-in one place at a time. Same as Windows RDP.

Once realizing that and signing out Ubuntu via ESXi, I was able to sign-in!

Screenshot of Ubuntu desktop with some windows open, including terminal, file manager, and Chrome.
Ubuntu looks a tad different in an RDP session.

So now that almost unrelated journey was over, it was time to get to the meat: setting up that bash script.

Task 2 – Running the Dreamhost Dynamic DNS Script

I’m not going to go through all the instructions since the script’s GitHub page lists them, but I’ll just briefly tell of things I got stuck on and how I got around it.

The command syntax is listed as

dynamicdns.bash [-Sd][-k API Key] [-r Record] [-i New IP Address] [-L Logging (true/false)]

I had already created the API key in Dreamhost and the new A Record (with a “fake” IP address) that I wanted the script to update. So just plug and chug at this point. The instructions for the -i flag said that if it was empty, the script would automatically use dig to find the external IP of the network. That’s obviously what I wanted since my home IP address could change. But then it kept giving me an error that the flag required an argument.

Ubuntu Terminal test showing the bash command and the error generated.
But I thought it’s supposed to have no argument…

Eventually, I tried not including that flag and it appeared to succeed! I checked out the DNS on the Dreamhost panel and the IP address was now showing my external IP. I tried updating the DNS with either various IPs via the script a few times to make sure it was working, and each time the A Record listed in the Dreamhost DNS showed the IP address I used.

Future configuration changes can be made in the config file that the script creates when it’s first run, instead of the command line. However, I couldn’t find where that was at first; it wasn’t in the same directory as the script itself. Reading through the script itself, it seemed that it created it in a hidden .config directory in the user home folder. The config file is conveniently called dynamicdns.

Naturally, I don’t want to have to manually run the script each time. The whole point of using DDNS services is that it’s periodic and automatic. If I have to run the script every time myself, might as well just forget all this and make the change manually in the DNS! Time to set up a Cronjob.

Task 3 – Automating via Cron

I’ve messed with Cron exactly once before. I can’t even remember why I did it and, therefore, didn’t remember how to use it. I followed this guide by Digital Ocean to install Cron (wasn’t sure if it was installed already). I chose to use nano as my editors because my experiences with vi have not been great.

Cron requires a schedule and the command or thing to run. I wanted to have the script run hourly, so that if my home IP did change, it’d get picked up relatively quickly (ignoring any delays in DNS propagation). Trying to understand how to format the schedule can be challenging…so back to Google, where it found the Crontab Guru.

Screenshot of Crontab Guru website.
Immature, I know.

Playing around with guru helped me better understand how the scheduling syntax worked, as opposed to reading examples. I quickly found that running the command hourly could be done with:

0 * * * *

Now all I needed was the command. Given that it was a bash script, I knew I’d need to use bash, followed by the path of the script. But what was the path of the script? It was in a subdirectory in my home directory, but what’s the path? I noticed that a lot of cron examples had something like ~/bin/filehere. What does the tilde mean?

Apparently it means the home directory. So after playing around a bit and testing—I set the schedule temporarily to run every 5 minutes and set the A Record IP to something else—I figured out the correct path after noticing the IP address in the DNS finally changed. This is what the complete cronjob looks like:

Screenshot of the cronjob after using command crontab -l.
Maybe I should’ve tossed the script in ~/bin/

All Done! Maybe?

Well, no. This was all done just so I could set-up VPN access via the Unifi Controller. Which is set up, but I haven’t had a chance to test! It’s late and I’ll be in the office later this week, so I’ll try it out then.

Even though this was just prep work, it was good opportunity to play around with Ubuntu and Linux more, in particular the CLI. I recently expanded size of the Ubuntu VM and had to do a little bit of CLI work, but it really wasn’t that much. And I can’t imaging I’ll be doing that very often. Before this, I think the last time I played around in Terminal was when I was setting up the Unifi Controller as a service, via systemctl. So not a whole lot of experience collectively, but I’m hoping to do more stuff like so I can get better acquainted. That’s what a Homelab is for, right?

I’ll report on the VPN at later date.

Game Complete! The Legend of Heroes: Trails in the Sky

So this is a thing I’ve been wanting to do over the years but never got around to doing it: Recording when I finish a game. I am terrible about finishing games, especially JRPGs, so I feel like I need to keep a record of the rare times it actually happens!

I just finished the JRPG, “Legend of Heroes: Trails in the Sky” (Steam/PC). I’m not going to do a review, but it is an excellent game. But I knew that going into it. Because this is the second time I’ve completed it! I actually played it when it was it initially released in the West on the Playstation Portable (PSP) 10-15yrs ago. I’m pretty sure I still own the UMD disc for my still working PSP.

So why replay this game? Because there’s a second and third chapter to it. I initially expected to play at least the second chapter on the PSP back in the day, but unfortunately it never released to PSP. Instead the second chapter went to the PS3, and I just never got around to playing it.

Then it was re-released on Steam in 2014, and the remaining chapters were finally released on Steam in 2015 and 2017. As such, the second and third chapter have been on my radar for a while. I recently picked up the additional chapters, but since it’s been so long since I’ve played the first chapter, that I’d forgotten most of the story, it made sense to simply replay it. And I’m glad I did.

Some details of this playthrough:

  • Installed: 2022-09-23
  • Start Date: 2022-09-23, est.
  • Time in-game based on Steam: 80.7 hrs
  • Time in-game based on Save Data: 60.5 hrs
  • Completed: 2022-10-26

So 60-80hrs over about a month. Not bad. Especially when most of my JRPGs can take me years to finish, if I even do finish them. I often restart them multiple times, because I’ll sometimes put a JRPG down for a few years and forget everything (Looking at you Final Fantasy XII…).

On to the second chapter! My goal is to finish that one and the third by the end of the year.

Afterwards, maybe I’ll move to some of the other LoH games that I’ve been working on over the years. The LoH series has quite a lot of games, much like the Final Fantasy series. “Trails” is just one subseries of LoH. I played all of and completed 2/3 of the so-called “Gagharv” subseries on PSP back in the day. I also completed the first chapter of the “Trails in the Sky” subseries on my Vita, and have been playing the second chapter on and off for the last few years. See what I mean?


One last thing…

Other games I’ve completed in 2022 so far:

  • Final Fantasy VII Remake (PS4) – Completed on 2nd restart.
  • Desperados III (Steam/PC) – Finished 2022-05-17; started it back in 2020 at the beginning of the pandemic.
  • The Great Ace Attorney Chronicles (Steam/PC), both first and second parts – Finished 2022-09-05; started 2021-07-30.

Homelab Chronicles 08: Investigating the Incident

(Continued from Homelab Chronicles 07).

From the moment I woke up, through work, and into the afternoon, I was constantly monitoring my network. I have the Unifi app on my phone, so it was easy to see the list of clients connected to WiFi. Luckily, nothing unexpected connected.

At this point, I assumed my neighborly adversary (adversarial neighbor?) knew they had been caught. The WiFi network they had connected to had disappeared overnight, as did my similarly named “main” one. In its place, a new SSID would pop up on “Emily’s iPad” when they tried to connect, with a name that wasn’t mean, crude, or insulting, but one with a subtle message that basically says, “I see you and I know what you did.”

I forgot to mention that my main WLAN has always used WPA2/WPA3 for authenticating. I think there are ways to crack WPA2, but I’ll get into that in the future.

Once I got home, I jumped back onto the Unifi Controller to see what information I could glean. Having “fancy” Ubiquiti Unifi gear means the platform records and stores a lot more information than the average household router. I mentioned in the previous Chronicle that the Controller can tell me the device manufacturer by looking up MAC addresses. I can also see connection histories. With packet sniffing and traffic analysis tools, I can also see general traffic usage, i.e. where they were going.

So when did they first get on my network?

Unifi gives alerts when devices disconnect and connect. I silenced these alerts, because that’d be annoying for as many devices I have, but it records these nonetheless. It also shows the last 5 times a device connected, along with a duration. Most of the unauthorized devices appeared to have connected within the last 10-14 days. However, I did see one device with a recorded connection date around 20 days ago. It was connected for 13 days straight. It had “Amazon” in the hostname, so I’m assuming it’s some kind of smart home device that’s always on.

Sadly, because my server, and therefore Controller, was turned off to save on AC and electricity costs, there are large gaps in the 2-3 month history. It’s possible the devices were connected further back than 20 days ago. But that “Amazon” device only had two entries; 20 days ago and then overnight when I powercycled the WAP. So I’m assuming that nearly 3 weeks ago was when they first cracked the password.

Where did they go or what did they do?

Naturally, my next bit of curiosity was wanting to know what they were doing while connected. I needed to know if the adversaries were doing illegal things. Were they engaged in piracy? I don’t need a(nother) copyright strike on my ISP records! I hope to god they weren’t doing anything more illegal than that.

The Insights tab for the blocked devices showed me generally what they were doing. And it was mostly mundane, everyday stuff. Lots of streaming content from YouTube, Netflix, Hulu, Spotify, etc. Looking at that “Amazon” device, I could see traffic entries for Hulu and Amazon Video. Maybe it’s not a smart home device, but instead a Fire Stick or Fire Tablet. Interestingly, I deduced they have a child: I found a traffic entry on a blocked device for Roblox, the popular kids game. I’m more of a Minecraft guy, myself.

Traffic sources for a single device in Unifi Console.
Roblox? Oof.

Looking at Internet traffic overall, I could see there were other devices that were connected prior to my discovery. The only ones I outright blocked were those that happened to be connected to WiFi at the time. There was traffic to Xbox gaming services, which was tied to a device with an appropriate hostname: XboxOne. It looked like they downloaded a game or update/patch since it was a sizable 1.75GB download.

List of top Internet traffic sources in Unifi Console.
Probably some Call of Duty “scrub noob.”

But overall, traffic was pretty low. Certainly not enough for me to notice Internet speed degradation. Helps that I have gigabit fiber.

It doesn’t look like they were engaging in torrenting of pirated material, but at the same time, I’m not familiar with how that would look in Unifi. There isn’t a “Torrenting” category of traffic that popped up and I don’t know if that exists. But given the overall low data usage, it doesn’t seem that way.

Is this a crime?

I do want to point out that what “Emily” did is highly illegal. They hacked/cracked their way into my network. Every state in the US has laws on the books about this, as does the federal government, I’m sure. But not only did they engage in unauthorized access to a network, they also used my Internet connection, that I pay for. That’s theft of services. I didn’t authorize “Emily” and their family to be on my network, nor did I allow them to use my Internet connection.

“Unauthorized access” entails approaching, trespassing within, communicating with, storing data in, retrieving data from, or otherwise intercepting and changing computer resources without consent. These laws relate to these and other actions that interfere with computers, systems, programs or networks.

National Conference of State Legislatures – Computer Crime Statutes

But then who would I report this to? And who would investigate this? My city PD and the state have more important things to worry about. I think.

Speaking of worry, because of how they entered the network, by cracking into it, I’m still worried about my computers. While one of my cybersecurity buddies introduced me to SIEMs a few months ago and had me install Wazuh on my server, I only have it monitoring one computer, the one I use the most. I have other computers that are on almost all the time that I don’t use as much. More importantly, I’m not anywhere near proficient enough to be able to analyze all the logs that Wazuh is collecting. As a result, I still need to figure out what I want or need to do about my computers. Were they able to gain access to them? Upload and run malicious code?

On the other hand, someone online that I talked to about this did mention that it was odd that they didn’t attempt to obfuscate their device names. So maybe they’re just a “script kiddie” that for some reason can’t or doesn’t want to pay for their own Internet like an adult.

Regardless, it still has me worried. And that’s the rub. Even though this was entirely digital, it feels the same as if someone physically broke in and entered my home without me knowing. And then stayed there, hidden away, in the attic.

As an introvert and a sort of hermit (Look, it’s hot and humid as hell out there!), my home is my sanctuary. I’m sure that’s true for everyone, introvert or not. But because I spend so much time on my computers for work and for leisure, that too is my “home,” as sad and ridiculous as that may sound. Same concept though; in this world we live in, our “digital life” through our devices and everything stored on them is important to each of us. Find me a person that would be OK with someone “rifling” through their cell phone. Or OK with someone posting even a silly status on their Facebook or Twitter behind their back. Some people don’t even want their family or significant others to look through their phone, much less a stranger. My privacy has been invaded and my feeling of safety, shattered. It sounds dramatic, but it’s true.

I still have work to clean this up. And I have some ideas. But I’ll get to that on my next post, Soon™, which will wrap this ‘incident’ up.

—To be continued.

Homelab Chronicles 07: ALERT! – Unauthorized Access

It’s been awhile since I’ve done anything with my Homelab. I’ve been busy with work, travel, and lounging around. There’ve even been extended periods over the last 2-3 months where my server has been completely turned off so I can save some money on electricity during the hot, hot summer. Plus, when it’s 100°F (37.7°C) outside and my AC is trying to keep things at a “cool” 78°F (25.6°C), the last thing I need is a server putting out even more heat.

But I was forced to take a look at things the other night when my Ubiquiti USG was making strange sounds. Fearing that it was going out, I wanted to look around to see how much a replacement would cost. I needed some information on my USG, so around midnight before going to bed, I booted up the server — it hosts an Ubuntu VM that itself hosts the Unifi Controller — and signed-in to the Unifi Controller via Web.

Almost immediately I was struck by how many clients were supposedly connected to the network: 34 devices.

Now, I’m a single guy with no kids, living in a 2-bedroom apartment. But I’m also an IT professional, a geek, and a gamer. I have several computers, cell phones, tablets, consoles, and such. I also have some smart home stuff like plugs, thermostat, cameras, etc. But the number of devices connected is pretty stable. Like 20-25.

So to see 34 clients was surprising.

I started with the list of wired connections. About 10 devices that I mostly recognized, even with just MAC addresses. Unifi has a neat feature where it’ll lookup MAC addresses to find manufacturer information. Anyway, all good there. So I went to the list of wireless connections.

At the very top of the list, I saw 10 devices that I didn’t recognize. One had a hostname of “Emilys-iPad.” I’m not an Emily. I don’t know an Emily. And I certainly don’t have an iPad named Emily…’s-iPad.

List of Devices in Unifi Console
Who the hell is Emily and why does she have an iPad on my network?

My heart started racing and I got jitters. Devices were on my WiFi network that were not mine. Devices that I didn’t authorize, by someone that I didn’t know. There were a couple Amazon devices, an LG device, and other hostnames I didn’t recognize. But I don’t have any Amazon devices, nor LG.

How long have these been on my network? Whose are these? But more importantly, how did they get on the network?

I didn’t spend much time answering those questions, as the situation needed to be dealt with. Instead of going to bed, I took a screenshot of the device list with hostnames and MAC addresses, and then immediately got to work.

To start, I disconnected and blocked all the devices from connecting to my WAP. I noticed that all the devices were connected to a secondary WLAN with a separate SSID; more on that in a second. I disabled and then deleted that WLAN. I then powercycled the USG and the Unifi WAP to make sure those devices were off the WLAN and wouldn’t be able to connect again. When it restarted, nothing was connected to that WLAN and only my devices were connected to the “main” WLAN. The threats were removed.

OK, so now about this WLAN. Some months ago, I whipped out my old Playstation Portable (PSP). I was feeling nostalgic and wanted to find some old games on the Playstation Store, so I needed to connect my PSP to the Internet. I have a modern WiFi 6 (802.11ax) Unifi AP. Unfortunately, the PSP, being so old, can only connect to 802.11b or 802.11g networks. I can’t remember the decision making process, but I eventually created a secondary WLAN, that was specifically for b/g devices. And of course I password protected it. However, since the PSP is old, I used the old-school WEP (Wireless Equivalent Privacy) as the password protocol.

Devices were on my WiFi network that were not mine. Devices that I didn’t authorize, by someone that I didn’t know.

Anyway, after I was finished with my PSP, I didn’t take the network down. “Never know when I might want to use it again,” I thought. So I left it up. Nothing was connected to it since. Since then, I’ve signed-in to the Unifi Controller a handful of times and never noticed anything other than my devices on my main WLAN. I honestly forgot that I even had it up. Until this happened.

With the threats neutralized, I could finally start doing some investigating. And my first question was obviously how they got on the network.

I’m assuming I password protected the WLAN. Because I’m not an idiot. Usually. But if it was only with WEP…well, there’s a reason why we’ve moved to WPA (WiFi Protected Access), WPA2, and WPA3.

According to Wikipedia, WEP was created in 1999. 23yrs ago. And over time, major vulnerabilities were found quickly. Without getting into the nitty-gritty, it’s not hard to crack a WEP password. There are programs out there online that are easy to find to sniff packets, analyze data, and eventually crack the password. Possibly in minutes.

That said…it’s not exactly something I’d expect my average neighbor to be doing. I’ve known about cracking WiFi passwords and “wardriving” for a long time. But even I’ve never done it.

I got a little nervous thinking about that. What kind of adversary is one of my neighbors? Are they also an IT person? Maybe a security professional?

And if they were on my network, what else did they see or even touch? In retrospect, it was dumb of me to do this, but I didn’t put that WLAN on a separate VLAN. I mean, why would I? I’m the only one connecting to it, with my one device. What that means is if anything connects to that b/g network, they’re on THE network. They can see my computers, my server, my consoles, my smart devices…everything.

Do I now have to wipe all my computers and VMs? I mean, some need it, but it’s still an undertaking to have to redo everything. It’d likely take a whole weekend and then some.

"Ain't Nobody Got Time For That"

That led me down another path, concerning my “main” WLAN. Did I use the same password for that b/g network, too? If so, they’d know the password to my main WLAN, as well, which has a different, but similarly-styled SSID.

So I nuked my main WLAN and created an entirely new one with a new SSID and new complex password. I then had to reconnect my smart home devices.

At that point, it was already around 2:00am, and I had to go into the office in the morning. What started as me wanting to find some model information on my USG turned into DEFCON1 at home.

But with the unauthorized devices off the network, a new WLAN, and the important devices back online, I felt somewhat comfortable going to bed. The investigation would have to wait until I got home the next day.

—To be continued.

Homelab Chronicles 06 – “Hey Google…” “I’m Sorry, Something Went Wrong”

I woke up early today, on a Saturday, to my alarm clock(s) going off. I was planning to go to a St. Patrick’s Day Parade and post-parade party with a friend. After turning off my phone alarm(s), I told my Google Nest Mini to stop the alarm that was blaring.

Unfortunately, it informed me that something went wrong. Though it did turn off. Usually when my Google Nest Mini has issues, it’s because WiFi messed up. So I stumbled out of bed, still half-asleep, to the guest bedroom, where the network “rack”—a small metal bookshelf—and the Unifi AP was at. My main 24-port switch had lights blinking. I looked up at the AP high up on the wall and saw the steady ring of blue light, indicating everything was working. OK, so not a WiFi problem, nor a network problem. Probably.

In the hallway, I passed by my Ecobee thermostat to turn the heat up a little and then noticed a “?” mark on the button for local weather. Ah, so I didn’t have Internet. Back in my room and I picked up my phone: 5G, instead of WiFi. On my computer, the Formula 1 livestream of the Bahrain track test, which I fell asleep to, had stopped. And reloading the page simply displayed a “No connection” error. I opened a command prompt and ran ipconfig /all and ping 8.8.8.8. The ping didn’t go anywhere, but I still had a proper internal IP in the subnet. Interesting. Guess the DHCP lease was still good.

Only one last place to check: the living room where the Google Fiber Jack and my Unifi Secure Gateway router were. Maybe there was a Fiber outage. Or maybe my cat had accidentally knocked the AC adapter off messing around in places he shouldn’t. Sunlight was streaming in from the balcony sliding door, making it hard to see the LED on the Jack. I covered the LED on the Fiber Jack with my hands as best as I could: it was blue. Which meant this wasn’t an outage. Uh oh. Only one other thing it could be.

Next to the Fiber Jack, surrounding my TV, I have some shelving with knickknacks and little bits of artwork. Hidden behind one art piece is my USG and an 8-port switch. I removed the art to see the devices. The switch was blinking normally. But on the USG, the console light was blinking with periodicity, while the WAN and LAN lights were out. Oh no, please don’t tell me the “magic smoke” escaped from the USG.

On closer inspection, it looked like the USG was trying to boot up repeatedly. It was even making a weird sound like a little yelp in time with the console LED going on and off. So I traced the power cable to the power strip and unplugged it, waited 15 seconds, and plugged it in again. Same thing happened. I really didn’t want to have to buy a new USG; they’re not terribly expensive, but they’re not inexpensive, either.

I tried plugging it into a different outlet on the power strip, but it kept quickly boot-looping. I then brought it to a different room and plugged it into a power outlet; no change. Great.

But then I noticed that there was a little green LED on the power brick. And it was flashing at the same frequency as the USG’s console light when plugged in. Hmm, maybe the power adapter went bad. I could deal with that, provided I had a spare lying around.

The Unifi power brick said “12V, 1 amp” for the output. So I started looking around. On my rack, I had an external HDD that was cold. I looked at its AC adapter and saw “12V, 2 amps.” That was promising, but could I use a 2 amp power supply on a device that only wants 1 amp? I looked online, via my phone, and the Internet said, “Yes.” Perfect.

I swapped the AC adapter on the USG. The little barrel connector that goes into the USG seemed to fit, if not just a smidge loose. Then I plugged it back into the wall.

It turned on and stayed on! Ha!

I brought it back to the shelf and reconnected everything. It took about 5 minutes for it to fully boot up. Afterwards, I went back to my computer and waited for an Internet connection to come back, and it did.

All in all, it was a 15-20 minute troubleshooting adventure. Not what I preferred to do straight out of bed on a Saturday morning, but it got fixed. I already ordered a new AC adapter from Amazon that should arrive in a few days.

Afterwards, I got ready and went to the parade. A bit nippy at about 25°F (about -3°C), but at least it was bright and sunny with barely any wind. I went to the party and had a couple beers. It definitely made up for the morning IT sesh.